
Operating instructions


15
V 01/12
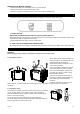
APPLIANCE START-UP
Open the packaging and remove the box from above. Remove the product and the other elements supplied (illustrated in
the box below).
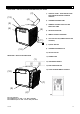
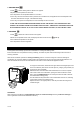
"Touch Screen" remote control
TIME RFUNC
CLOCK/CA N
SLEEP
POWE R
CHECK
7
WEEK
SPEED
AM
PM
SUN MON TUE WED THU FRI SAT
S
E
T
W
1 0
AUTO
Type AAA batteries for the remote control.
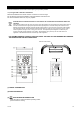
Circular connection to be positioned
between the end of the tube and the
terminal connection (A+B).
Opening kit for installation in window (also
for double glazing).
Flat connection to be positioned between
the air expulsion mouth and the flexible
hose, positioned between the window
leafs.
Flat connection to be positioned between
the air expulsion mouth and the flexible
divided up into two parts (A and B), to be
joined hose, easily applicable thanks to
the convenient magnet system.
(A)
(B)
Flat
connection
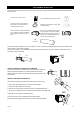
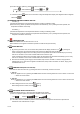
Position the product vertically on a firm, flat surface, as close to a window as possible, keeping a minimum distance of 50
cm from walls or other nearby obstacles.
Connect the connection (1) to the flexible hose (2) and connect it to the back of the air-conditioner. Extend the hose as
necessary to reach the outside.
(A)
(B)
(1)
(2)
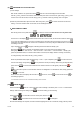
USE WITH TERMINAL CONNECTION FOR WINDOW
Connect the end part of the flexible hose to the terminal connection (4)
Open the windows and block one of the two leafs with the handle.
Rest the terminal connection on the fixed leaf,bring the other leaf of the
window close.
USE WITH THE WINDOW OPENING KIT
Connect the end part of the flexible hose to the circular connection (3)
Make a hole with a diameter of 140 mm in the window glass.
Insert the window without its closure cap.
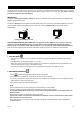
Remove the hot air terminal connection from the retracting flexible hose.
Bring the air-conditioner close to the window and insert the air discharge tube.
Avoid tight curves and folds in the flexible hose.
Connect the power cord to a suitable electrical socket (230V).
Insert the batteries supplied into the remote control, respecting polarities.
NO!
(4)
(3)