
manual

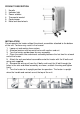


PRODUCT DESCRIPTION
1. Handle
2. Indicator light
3. Power selector
4. Thermostat control
5. Cord storage
6. Metal axle and wheels
INSTALLATION
Do not operate the heater without the wheels assemblies attached to the bottom
of the unit. To do so may result in fire hazard.
1. Loose nut and washer from casters.
2. Attached casters with two metal axles with washer and nut.
3. Turn the heater upside down for easy assembly.
4. Place the metal axle and wheels assembly between the last two fins at each
end of the heater.
5. Attach the axle and wheel assemblies onto the heater with the U bolts and
wiring nuts supplied.
6. Remove the wiring nut from the U bolts and insert the U bolt through the
holes in the axle and wheel assembly as shown, reattach the wing and tighten
firmly.
7. Turn the heater to its upright position for operation. The heater is upright
when the handle and controls are at the top of the unit.