
Operator`s manual


55
SECTION 11
ACCESSORY INFORMATION
Centre the track pin so that it does not stick out on either
side of the track.
2. Apply a drop of blue 242 Loctite to the hole in the lock
bushing and the set screw. Install the set screw using a
1/8" Allen wrench. TIGHTEN SECURELY. Set screw
must seat in ground recess of track pin.
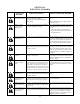
3. Assemble two complete tracks:
6 wheel models - 31 segments each side for 6x6
models
- 1 half segment
8 wheel models - 39 segments each side for 8x8 models
- 1 half segment
IMPORTANT: The actual number of track segments
used will vary and will be determined when the tracks
are being installed. Wrap the track assembly around the
tires. Ensure they are snug to the front and rear deated
tires. Then add or remove segments until there is a gap
of approximately 0 to 1" between the adjoining seg-
ments for all 8x8 models. These will have to be drawn
together using two C-clamp style vise grips to install
the connecting pin.
Supertrack & Rubber track systems require the assembly
of 605-77 axle extensions and 126-08 extension studs to
each wheel hub before installation of the tracks. Failure
to install these components will cause severe damage to
the lower body.
Note: Axle extensions are recommended for use only
with Argo Super tracks and Rubber tracks and should
be removed for tire-only use.
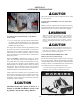
11.3.2 Installing the Axle Extension (Supertrack &
Rubber Track)
4. Raise the vehicle off the ground and remove the wheels
using 3/4" socket.
5. Install the extension studs on all of the vehicle wheel studs
and tighten securely with a 5/8" socket. See Fig. 11-3.
6. Place the axle extension collars onto the extension studs
and seat rmly against the axle hub plate. The small hole
must face away from the hub plate.
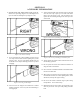
The extension studs have hexagonal sides and must
sit properly within the slots on the axle extension (See
Fig.11-4). If the extension studs are misaligned with the
slots of the axle extension collar when tightened, adjust
each stud as necessary by tightening them further (never
by loosening them), until alignment allows for the exten-
sion collar to slide on easily (by hand), up against the
axle hub. Torque to a minimum of 40 ft lbs. Once the
extension studs are tightened and aligned correctly, they
will not require re-tightening unless they are removed.
However, it is very important that with the Super Tracks
and Rubber Tracks installed, the wheel nuts of the Argo
are tightened to 55 ft. lbs. (75 N.m) initially, re-torqued
after the rst 10 hours of operation, then again after the
next 10 hours, followed by re-torquing every 25 hours
of operation.
Figure 11-3. Installing the Axle Extensions.
Figure 11-4. Check Stud Position in Axle Extension.
Damage to the extension studs, bolts, or axle extension may
occur if the extension studs are not tightened correctly. Use
good judgement when installing.
7. Tires must be checked for size and installed in a specic
order as shown in the charts, Figure 11-7. If this is not
done, chain windup will happen causing damage to the