
Operator`s manual


40
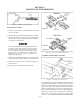
Figure 7-19b. Brake pad wear, HDi handbrake pads
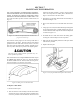
To replace the rewall:
1. Position the rewall in the driving compartment.
2. Slide in the bottom of the rewall rst and route the throttle
cable through the open area at the steering column.
3. Push in the top of rewall up against the tabs located on
the left and right hand side of the dash support.
4. Line up the rewall release catch with the mounting clasp
on the frame and turn clockwise 1/4 turn to lock.
5. Reinstall the shifting lever boot.
Do NOT operate the ARGO with the rewall removed.
Service Brake Bedding in Procedure
Bedding in of the service brakes is recommended by the
brake pad manufacturer to obtain maximum performance
and wear from the brake pads. When new service brake pads
have been installed, the following procedure will need to be
completed. Please include this procedure immediately after
service pads have been replaced.
1. Ensure that the service brake system has been bled to
provide maximum braking.
2. For this procedure select an area that is open and at, such
as an empty parking lot.
3. Drive the Argo at a speed of approximately 20kph. While
continuing to apply throttle, gradually apply the service
brake, slowing your speed down to 10kph, then release
the brake and accelerate back to 20kph. Do not bring the
SECTION 7
MAINTENANCE INFORMATION
Argo to a full stop (unless required for safety reasons).
Bringing the Argo to a full stop when the brakes are
hot may cause the brake pad to imprint itself on the
rotor. If this happens it will cause vibration and poor
brake performance.
4. Repeat step 3 a total of 10 times. Do not wait between
cycles to let brakes cool.
Brake components will be extremely hot at this point.
After the 10 cycles are complete, shut down the Argo and
allow the brakes to cool down. When brakes have cooled,
repeat steps 3 and 4. The bedding procedure is now complete.
The brakes may smell, and some smoke could be present.
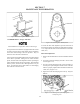
7.3.5 HAND BRAKE ADJUSTMENT (Frontier and
Avenger)
The brake system has been factory adjusted to ensure proper
braking effectiveness. However, before the vehicle is used
for the rst time, and after every 25 hours of operation, the
adjustment of the brake must be inspected.
The use of an improperly adjusted brake is a serious haz-
ard, and could lead to vehicle damage or personal injury.
The lockable holding portion of the brake system is not
a parking brake, and therefore is not designed to hold
the vehicle in place for long periods of time. The holding
brake is for short term use only.
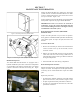
When parking on an incline, engage the holding brake
lever pin, leave the vehicle in gear, turn the engine off
and block the vehicle's wheels.
The hand brake lever should be adjusted such that when
squeezed and locked into position, it is capable of holding the
vehicle from rolling on a grade. It should also ensure a good
braking response when applied to stop the vehicle during nor-
mal operation. Loosen the locking jam nut at the adjustment
end of the brake cable and thread the adjustment "OUT" to
decrease brake lever travel and provide more braking action
or "IN" to increase brake lever travel and less braking action.
Retighten the jam nut.
If the holding brake system is too tight, excessive pressure
in the brake system will damage the seals.