
Operator`s manual


35
SECTION 7
MAINTENANCE INFORMATION
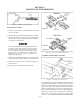
Figure 7-11. Hammering Slider Block into place.
7.2.5 IDLER CHAIN - Avenger & Frontier
HDi and HD do not employ idler chains in their design.
Avenger and Frontier models are equipped with 2 idler chains
to transfer power from the output shafts of the transmission
to the drive chains through a series of sprockets. They are
located on each side of the transmission.
A loose or improperly adjusted idler chain can result in damage
to the chain or sprockets. During the new vehicle break-in
period, check the idler chain adjustment before operating the
vehicle and after the rst 2 hours of operation. After the initial
break-in period, check the idler chain adjustment every 50
hours. An indication of loose idler chains is a loud banging
noise when the vehicle is turned.
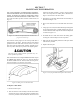
Figure 7-12. Measuring idler chain deection
To check the idler chain adjustment, push the slack side of
the chain and measure the amount of chain deection (Figure
7-12). Adjust the idler chain tension if deection is more than
3mm (1/8").
Idler Chain Adjustment
1. Remove the rewall from the vehicle as detailed in Section
7.3.4.
2. Loosen the 2 left side clamping nuts with a 15/16" socket
wrench (gure 7-13).
3. Turn the vertical adjustment bolts counter-clockwise to
raise the power pack and tighten the idler chains. The idler
chains are properly adjusted when the deection measures
3 mm (1/8"), (Figure 7-12).
4. Tighten the 2 left side clamping nuts securely. Torque to
80ft./lbs.
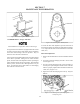
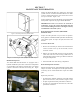
Figure 7-13. Location of power pack clamping nuts
and adjusting bolts