
Operator`s manual


30
replace the assembly with Part No. 607-171.
9. Return the screen assembly to the tailpipe and outlet tube
assembly and re-fasten it with the screw and internal tooth
lock washer from Step 4.
7.2 DRIVE SYSTEM & TIRES
Do not attempt to adjust, repair or replace the drive belt,
clutches or any moving part while the engine is running.
Doing so will cause injury. Before servicing the vehicle,
disconnect the battery to prevent accidentally starting
the engine.
Keep the engine compartment hood, clutch guard and
rewall securely in place when the engine is running.
Severe injury can result if the drive belt, clutch compo-
nents or other moving parts come loose.
If engine compartment inspection is necessary while the
engine is running, use EXTREME CAUTION! Keep
engine RPM low. Avoid standing directly in line with
moving components. Use a mirror to view the compo-
nents.
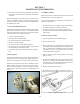
7.2.1 DRIVE BELT
The drive belt transmits power from the driver clutch (on
the engine) to the driven clutch (on the transmission). These
components are located on the left side of the engine compart-
ment (Figure 7-2).
Figure 7-2. Location of drive clutches and drive belt.
Check the drive belt after every 25 hours of operation, or
whenever there is a noticeable reduction in clutch perform-
ance. Replace the belt when:
• the top width of the belt has worn to 1-1/16" (27mm)
SECTION 7
MAINTENANCE INFORMATION
7.1.3 ELECTRICAL SYSTEM FUSES
All models of the ARGO are equipped with push-in type au-
tomotive fuses. The fuses protect the electrical circuits of the
vehicle. They are located in the fuse block, inside the engine
compartment, just in front of the steering system. Replace
any blown fuses. Return your vehicle to an ARGO dealer for
inspection of the electrical circuit if a fuse blows repeatedly.
7.1.4 SPARK PLUGS
Remove and inspect the spark plugs after every 100 hours of
operation. Clean the plugs and reset the gap as detailed in the
engine owner’s manual.
Replace the spark plugs if the electrodes are corroded or dam-
aged or if the insulator is cracked. Use the correct plug for the
engine as detailed in the engine owner’s manual.
Re-install the spark plugs carefully, taking care to start the
threads properly. Torque the plugs to 10 - 15 ft. lbs (14 to 20
N·m). Do not over tighten.
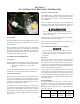
7.1.5 SPARK ARRESTER
Cleaning the Spark Arrester
After operating the engine, do not touch any part of the
exhaust system until it has had sufcient time to cool!
1. Keep a record of the number of hours of engine use. The
spark arrester should be removed, cleaned and inspected
every 50 hours of operation.
2. Remove the tail pipe assembly by disconnecting the springs
from the mufer attached to the tail pipe.
3. The screen-type spark arrester assembly is located inside
the tail pipe. It is fastened with one (1) slotted washer-head
hex screw and one (1) internal tooth lockwasher. Find the
screw on the side of the outlet tube.
4. Remove the screw and save it for step 8.
5. Take out the screen-type spark arrester assembly.
6. Shake loose particles out of the screen assembly.
7. Clean the screen with a wire brush. (Soak it in oil solvent
if necessary.)
8. If any breaks in the screen or weldments are discovered,