
User`s manual


Tracker3 User’s Manual 23
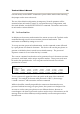
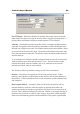
17.7. Configuration Profiles
The Tracker3 can store two separate configuration profiles. The profile currently
being shown is selected using the tabs at the top of the window labeled ‘Profile 1’
and ‘Profile 2’.
When it is first powered on, the Tracker3 will always start out using Profile 1.
After startup, profile selection depends on the settings in the profile switching
screen. To access these settings, click ‘Profile Switching’. See the section below
on profile switch for more information.
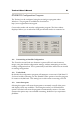
17.8. Loading and Saving Settings
After changing any configuration options, you must click the ‘Write’ button to
write the changes to the tracker’s firmware. You may also use the ‘Save to File’
button to save the configuration options to a file, which can be loaded later using
the ‘Load from File’ button.
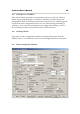
17.9. Basic Configuration Options
Callsign – The radio callsign to use when transmitting. Tactical callsigns may be
used, but FCC and ITU rules require periodic identification. If the actual callsign
is not used here, be sure to include it in the comment field.
Baud Rate – For normal VHF operation this should be 1200. 300 baud is
commonly used for HF. The Tracker3 uses mark and space frequencies of 1600
and 1800 hz respectively in 300 baud mode.
Path – This specifies the digipeater path to use. Specific callsigns may be entered
(e.g., ‘K6SYV-10, K6TZ-10’) but for APRS operation a set of common aliases are
usually used. A suggested default path is ‘WIDE1-1, WIDE2-1’. It is rarely
necessary to use a path greater than WIDE3-3 (requesting three ‘wide’ digipeater
hops), and excessive paths generate large amounts of traffic that degrade the
performance of the network. If you’re not sure what path should be used for
your local area, check with a local digipeater operator. This field may be left
blank.