
User manual
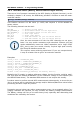


RP6 ROBOT SYSTEM - 4. Programming the RP6
1
2
3
4
5
6
7
8
9
10
11
12
13
14
15
16
17
18
19
20
21
22
23
24
25
26
27
28
29
30
31
32
33
34
35
36
37
38
39
40
41
42
43
44
45
46
47
48
49
50
51
52
53
54
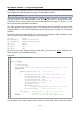
#include "RP6RobotBaseLib.h"
void acsStateChanged(void)
{
writeString_P("The ACS-status has changed! L: ");
if(obstacle_left) // Obstacle on the left
writeChar('o');
else
writeChar(' ');
writeString_P(" | R: ");
if(obstacle_right) // Obstacle on the right
writeChar('o');
else
writeChar(' ');
if(obstacle_left && obstacle_right) // Obstacle in the middle?
writeString_P(" Amidships!");
writeChar('\n');
statusLEDs.LED6 = obstacle_left && obstacle_right; // In the middle?
statusLEDs.LED3 = statusLEDs.LED6;
statusLEDs.LED5 = obstacle_left; // Obstacle on the left
statusLEDs.LED4 = (!obstacle_left); // LED5 inverted!
statusLEDs.LED2 = obstacle_right; // Hindernis on the right
statusLEDs.LED1 = (!obstacle_right); // LED2 inverted!
updateStatusLEDs();
}
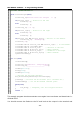
int main(void)
{
initRobotBase();
writeString_P("\nRP6 ACS - Testprogram\n");
writeString_P("_____________________\n\n");
setLEDs(0b111111);
mSleep(1000);
setLEDs(0b001001);
// Register the ACS Event Handler:
ACS_setStateChangedHandler(acsStateChanged);
powerON(); // Activate the IR receiver (incl. encoders etc.)
setACSPwrMed(); // set the ACS medium transmit power.
while(true)
{
task_ACS(); // Frequently call the task_ACS function!
}
return 0;
}
This sample program also demonstrates once again how to activate and deactivate in-
dividual LEDs.
You should connect the Robot to the PC and look at the output in the terminal and
- 94 -