
User manual


RP6 ROBOT SYSTEM - 4. Programming the RP6
Example 10: Finite state machines, Part 2
Directory: <RP6Examples>\RP6BaseExamples\Example_05_Move_04_FSM2\
File: RP6Base_Move_04_FSM2.c
ATTENTION: The robot will move in this example program!
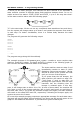
Now let's try out an FSM with a moving robot! The program is quite simple. First
Status LED 5 is blinking. With this, the Robot wants to tell us: “Would somebody push
the left Bumper, please?”. When you do this, RP6 moves backwards for about 15cm
and Status LED 2 starts blinking. Obviously, you are now supposed to push the right
Bumper, which lets the Robot move 15cm forwards again and the cycle starts from
the beginning.
The structure of the FSM is nothing special. It is nearly the same as in the first ex-
ample you saw above, where the program wrote “START State1 State2...” all the
time, but extended by adding a few conditional statements. In order to make the ro-
bot wait until a movement is complete, two states use the “isMovementComplete()”
function. Within these states, the program additionally executes a simple code frag-
ment using a stopwatch to toggle an LED in 500ms intervals. Of course, this fragment
may be replaced by any other code sequence – e.g. the running light from example 1.
We could write lots of pages about FSMs and similar topics, but as already stated –
this is only a manual and no reference book for Finite State Machines. So let's go on
with the example programs...
Example 11: Behaviour controlled robots
Directory: <RP6Examples>\RP6BaseExamples\Example_05_Move_04\
File: RP6Base_Move_04.c
ATTENTION: The robot will move in this example program!
The previous automaton examples lead the way to the following program, which im-
plements a simple behaviour controlled robot. To reduce the complexity we only use
two small behaviours. We will extend this basic program step by step in the following
program examples in order to create a simple insect-like behaviour. The first step only
provides our “insect” with two tiny sensors, which report collisions.
Our first two behaviours are named “Cruise” and “Escape”. The “Cruise” Behaviour
will only tell the Robot to “drive forwards” and does not perform any other activities.
Of course, we may add some other things, e.g. driving a curved track after some time
or accelerating and slowing down according to the battery voltage level. However, for
modularity in a well designed program we advise you to seperate this in additional be-
haviours.
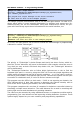
In contrast to “Cruise”, the “Escape” behaviour is quite complex. It will get active as
soon as the bumpers detect collisions. According to which bumper was hit, the beha-
viour lets the Robot drive back for a few centimetres, roate a little bit and sub-
sequently returns control to the “Cruise” behaviour.
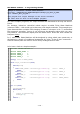
We can visualize this structure in a simple digram:
By using the “Suppressor” S the “Escape” behaviour suppresses the “Cruise”-beha-
- 117 -