
Instructions Circuit Diagram


- 69 -
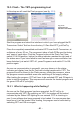
13. YETI PROGRAMMING
What’s next?
NowyoucompletedtheYetiandtherobotisworkingne.Arewereadynow?
No, you are not ready yet. You just completed the ouverture. The real job ist
still waiting!
Experienced C-programmers may directly proceed writing software. Beginners
may feel more comfortable reading the following chapter completely, even if
some parts of the story may seem to be an ancient history.
YETI’s brains
We will start a short overview in a summary. The main printed circuit board in
the YETI contains a miniature computer, usually named ‘microcontroller’. The
microcontroller is an integrated circuit (abbreviated IC) and you may easily
identify this chip as a small, black 28-legged box. Electric wiring connects the
microcontroller directly to the red LED-eyes, to the loudspeaker, to the infrared
communication system and to the servomotors, controlling YETI’s movements.
This is a short summary indeed, but we will proceed with a step by step ex-
planation for beginners. Just relax for a moment. Soon you will be writing your
rstprogramminglines...
YETI’s RED EYE LEDS
We will start a short overview in a summary. The main printed circuit board in
the YETI contains a miniature computer, usually named ‘microcontroller’. The
microcontroller is an integrated circuit (abbreviated IC) and you may easily
identify this chip as a small, black 28-legged box. Electric wiring connects the
microcontroller directly to the red LED-eyes, to the loudspeaker, to the infrared
sommunication system and to the servomotors, controlling the YETI’s move-
ments.
This is a short summary indeed, but we will proceed with a step by step ex-
planation for beginners. Just relax for a moment. Soon you will be writing your
rstprogramminglines...