
Instructions Circuit Diagram


- 61 -
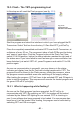
10.3. Flash - The YETI-programming-tool
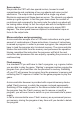
InthisstepwewillneedtheFlashprogram(seeg.10.2).
Start the program and select the interface in which you have plugged the IR-
Transceiver. Select Test.hex from directoryC:\Ownles\YETI_src\FirstTry.
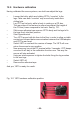
Place the completely assembled and tested YETI near the IR-Transceiver, at
a distance of max. 50 cm. The component sides of both PCBs must be facing
and “seeing” each other. Click the Program button at the Flash-Tool. Now
switch S1 to ON-position, before the status-indicator reaches the right end of
the status-area. If you have failed to react fast enough or communication has
been disturbed, just switch YETI off , press Programm and switch S1 to ON-
position again.
As soon as communication is succesful, you may observe in the status-
indicatoranddisplayhowtheleTest.hexisbeingtransferredtoYETI.The
programlewillbestoredintheFlash-memoryinsidetheprocessor,where
the program remains available even after switching off the supply voltage.
After loading the program, YETI will have to be switched OFF and ON again in
order to start the program. This sequence will execute the loaded program and
the green LED will lit up brightly.
10.3.1. What is happening while ashing?
As soon as the Flash program has been executed, the PC will try to
communicate with YETI. By switching on YETI, the system will be booted,
indicated by the Status-LED lighting for one second. YETI is checking to
see, if new software has been prepared to be loaded. If a new program has
been found, it will be loaded. After loading, the program can be executed by
switching OFF and ON once again.
Fig. 10.2.:
Flash-Tools for
Windows and LINUX