
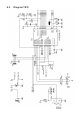
Instructions Circuit Diagram


- 18 -
1. Preheat the solder area which
must be soldered AND the com-
ponent wire with the tip of the
iron. Do NOT overheat it!
2. Add some solder to the
soldering area and
component wre but NOT
TO MUCH!
3. Ziehe den Lötdraht zurück
und lasse das Lötzinn richtig
fließen.
4. Take away the soldering iron
and DO NOT MOVE the
component or PCB!
5. Cut away the long component
wire just above the soldering spot.
The END RESULT is a nice and
shinny soldering spot which is
attached to the PCB copper and
component wire.
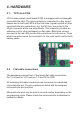
long-nose plier
Solder
0,8- bis 1mm
Soldering iron
(15 to 30W)
Diagonal cutter
Soldering iron
stand
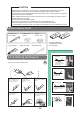
5.2.
Necessary tools
CAUTION
• Read this manual carefully in advance to fully understand how to assemble this product.
• Children below 14 should can only assemble this product with the help of adults.
• Be careful about tools. Especially be careful about sharp tools such as nippers or cutter knife
to prevent any injuries or accidents.
• Never assemble the kit when a younger child is around. The child might touch sharp tools or
swallow parts and a vinyl bag.
• Be careful about sharp edges of parts.
* Do not mix old and new or recharchable and non rechargeble batteries.
• Take out the batteries when you do not use the YETI for more than a week
•Thespecication,shapeandsizeoftheproductarebesubjecttochangewithoutpriornotice.
Screwdriver set
Necessary Batteries:
AA Batteries, 3 Pieces
(not included)
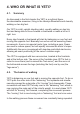
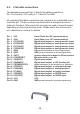
5.3. Soldering techniques:
Hold the iron like
a pencil
Only add a little solder each time
Correct position for professional soldering
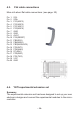
5.4. Troubleshoot soldering mistakes:
PERFECT SOLDERING
The soldering surface
looks nice and shinny
Not enough solder
Solder did not flow
Solder bridge
Two seperate solder spots are
connected to each other
Cold PCB
Solder is attached to
comonent wire but not to
the PCB copper
Only use lead free ROSIN CORE solder!
Never use any liquid- or paste flux!
PASTE