
Installation Instructions


Setting Up Your Light Punch GO
A: Power
1. Prepare the USB type A to USB type C cable.
2. Connect the USB type C side to the Light Punch GO Control Box.
3. Connect the USB type A side to a USB type A compatible 5V DC
output Power Adapter.
4. Plug the Power Adapter to the wall socket.
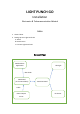
B: Data Process
1. 5V DC power output to the Mainboard through the USB cable.
2. The Mainboard communicates data with the mobile phone
application through Bluetooth.
3. The mobile phone App sends data to the Mainboard, the Mainboard
processes the data then sends signals to the Transition Board, the
Transition Board sends signals to LED lights.
4. When a user hit on a hit sensor, the hit sensor sends signals to the
Transition Board. The Transition Board sends the signals to the
Mainboard, the Mainboard processes the signals and sends data back
to the mobile phone App.
5. The mobile phone App communicates with the data server through
Wi-Fi.
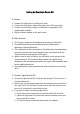
C: Connect Light Punch GO:
1. To connect Light Punch GO, check the App and go to "My account →
Connected devices".
2. Click on the icon to check connectivity and connect your Light Punch
GO. Light Punch GO will flash 3 times shortly with the same color as
the icon if connection is successfully set up.
3. If you have troubles connecting Light Punch:
1. Check internet connection of your phone and/or Wi-Fi router.
2. Switch off Light Punch GO and reset internet connection on your
phone and Wi-Fi router.
3. If it still cannot be connected, please visit our website.