
User Manual
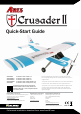


QUICK-START GUIDE
Full manual available to download from: www.Ares-RC.com
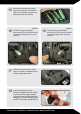
21
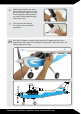
Check that the ailerons are
centered and, if not, adjust the
clevises to suit.
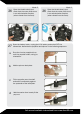
20
With the control surfaces centered,
connect the elevator and rudder
clevises to the outer hole of each
control horn noting that you may
have to screw the clevis in or out
to ensure that the control surface
remains in the neutral position.
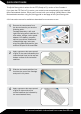
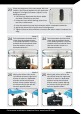
19
Stow the leads carefully, then
close and lock the hatch. In the
unlikely event that the servos
do not operate see the PAIRING
instructions at the back of this
guide.
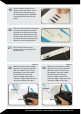
22 22
Make sure the control surfaces
operate in the correct direction.
With the model in front of you,
facing away, move the rudder
stick to the left and check
that the rudder moves left in
response. Right rudder stick will
move the rudder to the right.
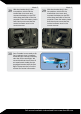
Make sure the control surfaces
operate in the correct direction.
With the model in front of you,
facing away, move the rudder
stick to the left and check
that the rudder moves left in
response. Right rudder stick will
move the rudder to the right.
Mode 2 Mode 1