
Instruction manual

6
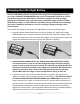
PLEASENOTE:ThischecklistisNOTintendedtoreplacethecontentincludedinthis
instructionmanual.Althoughitcanbeusedasaquickstartguide,westronglysuggest
readingthroughthismanualcompletelybeforeproceeding.
Removeandinspectallcontents
BeginchargingtheLiPoflightbattery(connectittotheDCbalancingcharger)
Assemble/installthewing,tailandlandinggear
Installtheeight(8)AAbatteriesinthetransmitter
InstalltheLiPoflightbatteryintheairplane(afterit’sbeenfullycharged)
Installthepropeller
Testthecontrolstoconfirmproperoperation
Familiarizeyourselfwiththecontrols
Findasuitableareaforflying
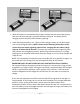
Usetheincludedadhesive‐backed‘hook‐and‐loop’material
toinstallthe4+channelreceiver(notincluded)compatible
with the transmitter you’ve chosen to use. Install the
receiverintherecessedarealocatedjustbehindtherudder
and elevator servos. Or, if for any reason the receiver will
notfitin
therecessedarea,installitintheareajustbehind
the ‘bump’ located behind the recessed area. Plug the
3‐wire lead from the ESC into the ‘throttle’ channel, the
elevator servo lead into the ‘elevator’ channel and the
rudderservoleadintothe‘rudder’channelonthereceiver.
NOTE: It’s important to ensure correct polarity when
plugging the leads/connectors into the receiver. Refer to
the markings on the receiver (or the instruction manual
for the receiver) to identify which pins accept the black
color (negative/ground), red color (positive) and white
color (signal) wire leads. Also, depending on the
make/model
of receiver it may be necessary to slightly
‘bevel’theedgesofthe blackcolorconnectorssotheyfit
easilyinto thecaseofthereceiver.Werecommendusing
a small file or sanding block and EXTREME CAREto bevel
theappropriateedgesoftheconnectorsasneeded.
Installin
g
the Receiver
(RFR Version Onl
y
)
Before the First Fli
g
ht Checklist (RTF Version Onl
y
)