
Installation Manual

ArecontVisionMicroDome™InstallationManual
Page | 5 support@arecontvision.com
Installation
1. Cutaholeintheceilingusingthetemplateprovidedonpage12(3.25inchesindiameter)tofitthe
camerahousing.
2. Pullthenetworkcablethroughtheceilingandplugitintothenetwork
connectoronthecamerahousing(Note:thiscanbedoneatalatertimeif
thereisaccesstothenetworkconnectoronthecamerahousingafter
installationintotheceiling).
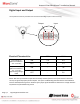
3. Checkthatthe
indicatorLED’sareindicatingthedesir edconditions(see
LEDIndicatortable).
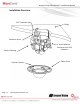
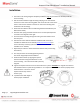
4. Pushthethreespringactuatedretentionarmsintotheupwardposition
asshowninthediagramtotheright.
5. Insertthecamerahousingthroughtheceilinguntiltheretentionarms
lockintoplace.
6. UseArecontVision
softwareAV100orAV200locatedontheCDor
availablefordownloadatourwebsite(www.arecontvision.com)for
cameradiscoveryandsetup(seeInstructionManuallocatedonCDor
availableonourwebsite).
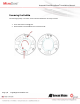
7. Adjustthepanandtilttoobtainthedesiredfieldofview(seeFocusing
Instructions).
8. Lensmaybefurthersecuredbytighteningthelens
lockscrewusingPhillipshe adscrewdriver.
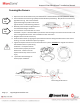
9. InstalltheDome
Coverbyaligningthecaptive
fastenerwiththematingthreadedinsertonthe
camerahousing.Thecoverwillbeheldinplaceby
magnets.
10. TightenthecaptivefastenertosecuretheDomeCoverinplace.CAUTION:Themagnetsaremeantto
holdtheDomeCoverinplaceduringinstallation.Thecaptivefastenermustbeusedtoproperlysecure
theDomeCover.Failuretousethe
captivefastenermayresultin
seriousinjury.
11. TapDomeCoverwithfingerto
ensureproperinstallation.