
Installation Manual


Installation Manual
Page | 7 support@arecontvision.com
+1.818.937.0700 877.CAMERA.8 www.arecontvision.com avsales@arecontvision.com
MegaVideo® Flex
Mounting the Sensor Unit
1. Determine a secure location to mount the camera.
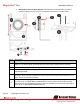
2. The camera can be mounted four ways: by cutting a hole and mounting the camera directly to a
metal/wood surface or by using the supplied metal mounting bracket and attaching it to a
metal/wood surface or via the ¼” 20 UNC thread, or via the MF-FMA flush mount bracket (sold
separate). Choose the best method for your installation:
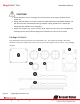
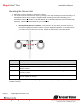
a. Directly Mount Sensor to Surface: This method is for use when you have access to
the unit from behind the wall or surface. Use the supplied template or 1 7/8” hole saw to
cut a hole in the surface for the sensor. Follow the instructions in the table below:
Reference #
Description
1
Attach one of the two camera fastening nuts along the front edge of the camera bubble.
2
Insert the camera module through the front of the hole until the fastening nut is flush
with the surface.
3
Insert the other camera fastener nut on the back of the camera and tighten until
securely in place.
4
Use the supplied Hex L-key to lock the set screws on both fastening nuts in place. Do
not over torque the screws.
Note: steps may need to be reversed depending on the amount of space to tighten the fastening nut
inside the surface.