
Installation Manual


Installation Manual
Page | 12 support@arecontvision.com
+1.818.937.0700 877.CAMERA.8 www.arecontvision.com avsales@arecontvision.com
SurroundVideo® Omni SX
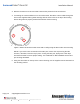
5. Snap bubble (without gasket) into flush mount trim ring and attach the trim ring to the flush
mount adapter by rotating until it magnetically snaps in place then tighten the trim ring screws.
6. To configure the camera, reference the set-up section.
Pendant Mount
For a proper pendant mount installation, the AV-PMJB-W pendant mount and SO-CAP-W mount cap
are required (sold separately). A pendant mount should only be attached onto hard ceilings including
wood, plastic, metal, and concrete.
1. Using the mounting template, prepare the mounting provisions for the camera installation.
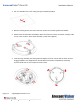
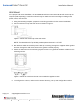
2. Connect top shield, pendant pole and mount together as shown in Figure 1.
Figure 1: Attach the mount cap and pendant mount
NOTE: The thread size of top shield, pendant pole and mount is 1.5” NPT.
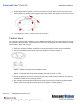
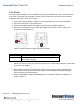
3. Attach the pendant mount to the ceiling using the four wood screws provided or any optional
hardware suitable for the mounting surface.
4. Run the Ethernet Cable and outside power cable (if necessary) through the supplied rubber
gasket and then through the pendant. Ensure the gasket is seated properly.