
Installation Manual


Installation Manual
Page | 11 support@arecontvision.com
+1.818.937.0700 877.CAMERA.8 www.arecontvision.com avsales@arecontvision.com
SurroundVideo® Omni SX
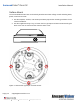
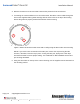
1. Cut a 9” diameter hole in the ceiling using the template provided.
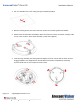
2. Remove existing Dome cover from Omni SX camera and remove gasket from Bubble.
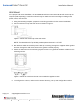
3. Attach Flush mount bracket assembly to Omni SX camera as shown and fasten a safety cable
to one of the 3 holes in the bracket assembly. (Cable not supplied.)
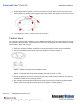
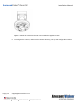
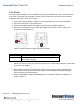
4. Insert housing assembly into ceiling hole and tighten the lever screws until the flush mount is
snuggly installed. The “Support Arm” will ride down the screw to compress the mounting
surface. NOTE: Do not over-torque the lever screws.
9”