
User manual


9 User Manual
Arduino Materia 101
ANATOMY OF ARDUINO
MATERIA 101
Your professional 3D printer Arduino Materia
101 is a tool of precision, ideated, developed
and assembled in Italy by qualified staff.
Before leaving the factory it was submitted
to a quality control and to a quality test
that guarantees its operation. It’s very
important, before you can use the printer,
knowing all the technical terms used in
this handbook and identify all the specific
components that form a Arduino Materia 101.
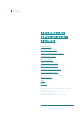
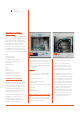
Fig. 1:
1. Carriage of axis Z
2. Glass printing bed
3. Printing bed rubber bands
4. Printing bed regulation screws
5. LCD panel
6. ON/OFF switch
Fig. 2:
1. Extruder
2. Extruder’s cable
3. Printing strand’s power hole
4. Material fan of cooling
5. Printing bed regulation screws
OPENING THE PACKAGE
Your Arduino Materia 101 is equipped with
a series of accessories that allow you to
make it immediately operative; there is
no software because it is open source and
constantly updated. Software must be
downloaded from the website of Arduino
to always have the latest version.
With care and without damaging the
packaging remove the various parts
and elements that fix the printer
inside the cardboard and then, by the
internal metal frame, pull it out.
Do NOT pull the soft black lead from the left
side and comes to the extruder: it is a power
cord and NOT handle. Proceed with the
recovery from the packaging of all the parts
and check that the material listed below are
all in the package.
Warning:
Do not throw away the original package. You
could use it if you have to send it or move it.
In the package you will find:
— Reel-carrier in assembly kiti
— Power cable
— SD Card with a few object that we loaded
for you
— USB cable
— Spay
— Glass printing bed
POSITIONING THE PRINTER
For proper operation, the printer must work
in a clean and dust-free, with an ambient
temperature between 5°C and
35°C. It is also preferable to a position
away from drafts or air conditioning.
In front is the power switch, while at
the bottom, in the center of the printer
is the electronic part’s aeration nozzle
from which depends the correct circuit
cooling: this must be left unobstructed.
Remember that the wire is usually in a
spool and that this should be positioned on
the reel-carrier included in the packaging.
The recommended position is behind the
printer, on the same floor, but there are
alternative positions that depend on the
presence of any walls or shelves near the
machine. The important thing is that the
wire is easily accessible and you can even
put multiple spools on the reelcarrier
without any hindrances or preventing the
entrainment of the wire by the extruder.
For this reason, the printer may not be
placed on a shelf that is at least 35 cm
free space around the rear or side.
Fig. 1 Fig. 2
1
1
4
5 5
3
4
2
2
3
65