
User manual


27 User Manual
Arduino Materia 101
determines the printing resolution (for
z-curves) and, consequently, the printing
time. The preset value is 0, 2 mm and
is a good compromise between speed
and quality, but you can go up to 0.05
mm or growing up to 0.35 mm.
— Filling: next menu “infill” the voice “fill
density” expresses the percentage of filling
the template. You can set values from a
minimum of 5% to a maximum of 100%.
This parameter will affect the speed of
realization of printing, the lower the fill
faster printing. Obviously with a low filling
will have a lighter piece and brittle. For this
the fill parameter can be varied depending
on the outcome you want to achieve. The
entry “fill pattern” lets you choose from a
drop down menu the texture that you want
to fill areas to the (straight, hexagonal, etc.).
— Supporting material: in the menu
“support material” you will be able to select
the menu item “support generated material”
and the program automatically will undercut
zones (zones of suspended model or having
the upper 45° inclination) of the support
towers. Before you select this option, you
should read the credits in Chapter 8 of this
manual and evaluate any workarounds
(changing orientation of the piece, etc.).
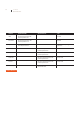
SLICING
Once you modified the parameters of
your interest, you can launch slicing. Go
back to “Plater” tab and click on “export
g-code”. Then you have to select the
destination and the file’s name, the process
will start. This process could take a few
minutes because it depends on imposted
parameters and model’s complexity.
When slicing is over, copy the g-code file
on the SD Card: you are ready to print.
Fig. 2