
User manual


19 User Manual
Arduino Materia 101
Your Arduino Materia 101 is a mechanical
device built with care both in design and
in the Assembly. To keep it in a State
of optimal functioning is necessary to
compensate for some normal processes of
adjustment, for example, due to repeated
thermal cycles of extruder motors.
With each print, the entire machinery
is subject to vibrations and movements
that in the long run can loosen the four
screws that hold the printing bed. This
leads to not have more precise and
uniform spacing of the glass plate from
the extruder which inevitably fails to
apply the first layer with the accuracy and
uniformity necessary for quality printing.
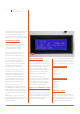
Just exit out of the box, Arduino Materia
101 should be even with the exact
factory calibration, but a long journey or
vibrations during transport may have done
move some adjustment screw (Fig.1)
LOADING THE FILAMENT
To be able to print you must load
into the extruder thermoplastic wire
that once pushed in heated room,
becomes fluid and may be extruded.
Arduino Materia 101 has a specific menu
item to load the filament and is located
under the heading “Prepare”. When enabled,
it starts heating the extruder and when
the temperature is reached, you can load
or unload the filament (the procedure is
identical to that which is accessible from
the menu “Tune” described in the previous
chapter).
Cold extruder to the filament is locked and
cannot be forced by pulling or pushing it into
the extruder.
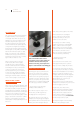
To load the filament, oblique cut the
plastic wire ends to form a bit and
put it in the pusher, making sure that
the wire runs, surpassing the sprocket
and into the hole below (Fig.2).
PREPARING THE
PRINTING BED
We remove the clothespins from the glass
and extract it from the printer. Sprinkle over
a thin layer of spray evenly up to cover the
entire surface (light you will have a shiny
effect). Now we await the complete lacquer
drying and glass are placed on printing
and secure it with pegs. Never spray inside
the printer because it means severely
damage the mechanical movements of
the same and consequently invalidate the
warranty. After a series of prints or when
the dish will have bumps or dirt residues
dates of previous prints, take off the glass
to wash it in lukewarm water in order to
report the conditions under which it was
when you bought the printer. Always pay
attention when moved the glass plate.
Reposition the glass printing bed in the
printer, with 2 clothespins block it as in
figure below. The position of the pegs
is not binding or final: pegs in blocking
the glass invade useful print area, you
can then change the position based
on which in turn will be printed, so as
not to find the clamp on the nozzle.
LEARNING TO SET
UP THE PLATE
This, though initially a bit laborious, will
become for you a habit that you do before
every printing quality, without this there
commitments for more than a few seconds.
With the experience you will be able to take
action during the printing of the first layer
in case you highlight any irregularities in
thickness. In general, acquire the right to
adjust the sensitivity of the press, even just
looking at the front and at the floor and the
extruder, it will be for you an advantage and
potential always prints guarantee optimal.
Fig. 1 Fig. 2