
User manual


31 User Manual
Arduino Materia 101
The possibilities offered by your Arduino
Materia 101 are very broad, but like all
tools, it has its limitations. This must be
understood and various countermeasures
must be implemented to deal with these. 3D
printing technology promises to create any
shape but there are frequent cases where
a print ends with a big disappointment.
ORIENTATION
Start with considering the orientation of the
object in relation to the direction of how
the printer builds it. The object is created
in layers and each layer is created so that it
overlaps the previous one. When a wall or
a surface is tilted more than 45 degrees or
some parts do not have anything beneath
them in the previous layers, the first question
to ask yourself concerns the possibility
to rotate the model to solve the issues of
tilted surfaces and free hanging details.
You might need to spin the object by 90
or 180 degrees, thus changing the portion
resting on the print surface. In general, if
you can find an orientation that allows a
reasonable flat surface to be in contact with
the print surface, you are ensuring that the
print does not come loose during the print.
Take the example of a door printed in
its natural position (vertical). The base
would be a very small area as opposed
to laying it down where the base
would be much bigger and less likely
to release from the print surface.
Maybe small details (such as the handle,
for example) do not allow the construction
of the door laying down. In this case, it
is recommended that you remove the
handle and print it separately. After they
are both printed, attach it with a little
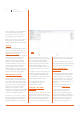
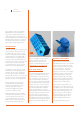
glue in its original position. An excellent
example of how the orientation can
make a printable object without any
problems (or adding media) can be found
at www.thingiverse.com/thing:37978.
It is a house-shaped lamp (Fig. 1).
JUST ONE OBJECT?
There are cases when printing the object in
one piece is unavoidable but there are as
many cases where you can and should cut
it into several parts so that the object can
print easier. An example of this that you
often see on the internet is the Eiffel Tower.
If you would print the whole small-scaled
model of the tower in one piece, then the
resulting object would be very small and
have very tiny details and this might not
be what you want. Besides, some of the
details might get lost when printing a model
in one piece. When cutting the model into
two or three parts, it is possible make a
bigger print with a smaller printer and get
finer details. The finished parts can easily be
assembled with a drop of glue and then you
have got a perfectly printed Eiffel tower.
SUPPORT STRUCTURES
If plastic being suspended in mid air is
unavoidable then you have to use some kind
of support for this part. A bunch of tilted
geese, for example, only have a very small
area to start the print on. The supports
are the solution that has technology
developed to overcome the force of gravity
and allow the creation of complex models.
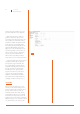
Another example would be suspended
parts and other parts (balls of a bearing)
with items that necessarily begin (moving
upwards) from nothing, such as arms not
placed on the hips in a figure (Fig. 2).
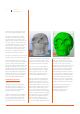
If the problem can only be linked to one
detail, then you can create a solution in the
model. Take the case of this famous model.
Thanks to an enterprising user, the model
was only modified with the addition of a
support necessary to achieve a flawless
printing. The lower part of the chin was
started from an added support that is
a tenth of a millimeter (Fig. 3 and 4).
In this way, a print that needs some
Fig. 1 Fig. 2