
User manual

25 User Manual
Arduino Materia 101
There is a wide range of programs available
for modeling software and for slicing
software. They come in free open source
form as well as paid professional form.
Slic3r is a free one and is used as a reference
slicing software. Its versatility makes it
useful for beginners and professionals alike.
SLIC3R
It is made by Alessandro Ranellucci and it is
an open source slicing software. It can be
downloaded from the download section on
www.arduino.cc/Materia101.
At the moment of the writing, the suggested
version is 1.1.5, which is the latest stable
version. Once you have finished the
download, unzip the folder and double
click the icon “Slic3r”. The program will
run without installation. Create a shortcut
on your desktop. During the launch, the
program may ask you to set the data
and the parameters of your printer: click
“cancel” and loaded the Arduino Materia 101
profiles as shown in the next paragraph.
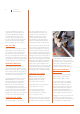
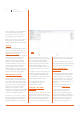
CONFIGURING SLIC3R
As a first step, it is recommend that you
switch to expert mode. From the file menu
choose “preferences” and in the drop down
menu select “expert”. To confirm the mode
you need to close and restart the program.
At this point, it is necessary to define the
parameters for the printer. In order to
simplify the process, these are made available
on the arduino web page.They are also part
of the files you already downloaded.
After that, choose “load config ...” from the
File menu; in the folder “profiles” that you
have already downloaded, select the file
“ArduinoMateria101.ini” and, once loaded,
click on the diskette icon next to the box
with the name of the profile you just loaded.
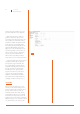
You must repeat the save operation for
each of the three tabs “Print Settings”,
“Filament settings” and “Printer settings”.
The profile will be available in future
sessions only after saving, otherwise it will
be available only for this session of “Slic3r”.
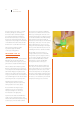
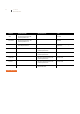
If you want to create different profiles, you
can modify one parameter and then save
the new configuration with a new name. It
is recommend not to overwrite the profile
already supplied by Arduino (Fig. 1).
Note: try and keep the names of
you configurations descriptive of
the parameters it contains.
LOADING THE MODEL
TO PRINT
In the “Plater” tab, you click on “Add” to add
your 3D model in .stl format; you can also
drag it into the program from an open folder.
Slic3r will center the object automatically,
but it will not automatically lay it down
on the surface. If your .stl file has not been
created with the base of the object on the
zero point of the Z axis, your print will fail.
You can lay out multiple STL’s or repeat the
same STL multiple times. At the beginning, it
is recommend you to try one file at a time.
BASIC PARAMETERS
OF SLIC3R
The Arduino Materia 101 allows you (thanks
to ’Use GCODE params” and PLA profiles)
to generate a G-code by setting only the
geometric parameters of your interest. You
can create specific G-code for individual
materials. If you are only using PLA, you do
not need to.
For further information, please consult
the Slic3r manual (manual.slic3r.org).
— Layer height: Inside the tab, “print
settings”, in the menu, “layers and
perimeters”, you will find the item, “layer
height”. This is the height of a single layer
and determines the printing resolution (for
shapes on the z axis) and, consequently,
the printing time. The preset value is
0. 2 mm and is a good compromise
Fig. 1