
User manual


19 User Manual
Arduino Materia 101
Your Arduino Materia 101 is a product built
with care, both in design and in the assembly
of the machine. To keep it in optimal
functionality, it is necessary to compensate
with some everyday adjustments. For
example: due to the expansion and
contraction of the motors, that become
hot and cold in a fluctuating manner.
With each print, the entire machine is subject
to vibrations and movements. In the long
run this can loosen the four screws that
hold the print bed. This leads to not having a
precise uniform distance between the glass
plate and the nozzle of the extruder, which
then inevitably fails to apply the first layer
with the accuracy and uniformity that is
necessary for quality printing. Straight out
of the box, the Arduino Materia 101 should
be calibrated with exact factory settings,
but vibrations from a long journey may
have altered the factory calibration (Fig.1)
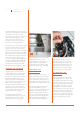
LOADING THE FILAMENT
To be able to print you must load a wire
of thermoplastic into the extruder, which
pushes the wire into the “hot-end” and
then becomes fluid, and may be extruded.
The Arduino Materia 101 has a specific
menu option to load or change filament
and it is located under the menu “Prepare”.
When chosen, it starts heating the
extruder and when the right temperature
is reached, you can load or unload the
filament (the procedure is identical to the
option accessible from the menu “Tune”
described in the previous chapter).
It is prohibited by the firmware to
extrude plastic when the hot-end is cold
and filament should not be forced by
pulling or pushing it into the extruder.
To load the filament in a correct manner,
cut the plastic wire end (to remove
any old melted wire ends), activate the
“change filament” option and make
sure that the wire runs past the feeding
sprocket and into the hole below (Fig.2).
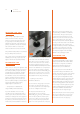
PREPARING THE
PRINTING BED
Remove the glass print bed from the
printer by releasing the clips. Spray a thin
layer of hair spray evenly over the entire
surface. Now wait for the hairspray to dry
completely and then place the glass on the
print bed and secure it with the binder clips.
Never apply the spray inside the printer
(do it in a well ventilated room, by a
window, or outdoors), this might severely
damage the mechanical components
and void the warranty. After a series of
prints or when the glass plate has bumps
of dirt and residue, remove the glass and
wash it in lukewarm water. Always be
careful when removing the glass plate.
Position the glass printing bed in the
printer with the two clips, as seen in
picture below. The position of the clips
is not binding or final. As long as they do
not invade any useful print area, you can
change the position based on what you
are printing. The most important thing is
that the nozzle does not hit the clamps.
CALIBRATING THE
BUILD PLATE
This, though initially a bit tiresome, will
become a habit that you do before every
print of higher quality. It will not even take
you a minute when you get used to it. With
experience, you will be able to take action
when printing the first layer if you notice
any irregularities in the plastic being laid
down. In general, it is a good idea to observe
the first layer of the print and take notice
of the shape of the deposited material on
the print surface. It should be pushed “into”
the surface so that it gets a good grip and
does not lose its grip later in the print.
Fig. 1 Fig. 2