
Reference Manual

Arduino® Nano RP2040 Connect
13 / 19 Arduino® Nano RP2040 Connect Modified: 12/07/2022
4 Board Operation
4.1 Getting Started - IDE
If you want to program your Arduino® Nano RP2040 Connect while offline you need to install the Arduino®
Desktop IDE [1] To connect the Arduino® Edge control to your computer, you’ll need a micro USB cable. This also
provides power to the board, as indicated by the LED.
4.2 Getting Started - Arduino Web Editor
All Arduino® boards, including this one, work out-of-the-box on the Arduino® Web Editor [2], by just installing a
simple plugin.
The Arduino® Web Editor is hosted online, therefore it will always be up-to-date with the latest features and
support for all boards. Follow [3] to start coding on the browser and upload your sketches onto your board.
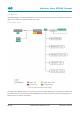
4.3 Getting Started - Arduino IoT Cloud
All Arduino® IoT enabled products are supported on Arduino® IoT Cloud which allows you to Log, graph and
analyze sensor data, trigger events, and automate your home or business.
4.4 Sample Sketches
Sample sketches for the Arduino® Nano RP2040 Connect can be found either in the “Examples” menu in the
Arduino® IDE or in the “Documentation” section of the Arduino website [4]
4.5 Online Resources
Now that you have gone through the basics of what you can do with the board you can explore the endless
possibilities it provides by checking exciting projects on ProjectHub [5], the Arduino® Library Reference [6] and the
online store [7] where you will be able to complement your board with sensors, actuators and more.