Smart WIFI Robot Car Kit for Arduino Table of Contents 1. Introduction ......................................................................................................................................................4 1.1 The UNO R3 board for Arduino .....................................................................................................5 1.1.1 Specification............................................................................................................................. 5 1.1.
Smart WIFI Robot Car Kit for Arduino 6. Start Programing.......................................................................................................................................... 41 6.1 Install Arduino IDE ........................................................................................................................... 41 6.2 Add Libraries ...................................................................................................................................... 45 7.
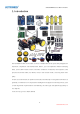
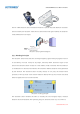
Smart WIFI Robot Car Kit for Arduino 1. Introduction The UCTRONICS WIFI Smart Robot Car Kit is a flexible vehicular kit particularly designed for education, competition and entertainment. With it, you can implement diverse interesting ideas, such as WIFI remote control, automatic avoidance of obstacles, line inspection, take pictures and record videos, etc. What’s more, in the manual mode, it has first person view (FPV). A robot is a machine that can perform some tasks automatically or with guidance.
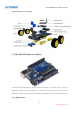
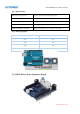
Smart WIFI Robot Car Kit for Arduino Each part of the car is as below: 1.1 The UNO R3 board for Arduino The UNO is the best board to get started with electronics and coding. If this is your first experience tinkering with the platform, the UNO is the most robust board you can start playing with. The UNO is the most used and documented board of the whole Arduino family. 1.1.1 Specification 5 www.uctronics.
Smart WIFI Robot Car Kit for Arduino Microcontroller: ATmega328P Input voltage (recommended): 7V-12V Operating voltage: 5V Digital I/O Pins: 14 (of which 6 provide PWM output) Analog input Pins: 6 DC current per I/O Pin: 40 mA SRAM: 2 KB (ATmega328) DC current for 3.3V Pin: 50 mA Clock speed: 16 MHz Flash memory: 32 KB (ATmega328P) of which 0.5 KB used by bootloader 1.1.
Smart WIFI Robot Car Kit for Arduino The HC-SR04 ultrasonic sensor module for Arduino is used for obstacle detection. Ultrasonic sensor transmits the ultrasonic waves from its sensor head and again receives the ultrasonic waves reflected from an object. Ultrasonic sensor general diagram 2.1.1 Working Principle The ultrasonic sensor emits the short and high frequency signal. These propagate in the air at the velocity of sound. If they hit any object, then they reflect back echo signal to the sensor.
Smart WIFI Robot Car Kit for Arduino 2.1.2 Specification Working voltage: 5V DC Output signal: Electric frequency signal Static current: < 2mA Output voltage: 0V(no obstacle),5V(obstacle in range) Sensor angle: <= 15° Echo signal: output TTL PWL signal High precision: Up to 0.3cm Input trigger signal: 10us TTL impulse Detection distance: 2-450cm Mode of connection: VCC, trig (T), echo, GND 2.1.3 Wiring diagram: HC-SR04 Ultrasonic Sensor Module UNO VCC 5V Trig A2 Echo A3 GND GND 2.
Smart WIFI Robot Car Kit for Arduino This is a commonly used DC motor drive module, using L293D chip with small current DC motor driver. The pins are made compatible with Arduino which is easy to use. 2.2.
Smart WIFI Robot Car Kit for Arduino 2.3.1 Specification Size: 23x12.2x29 mm Torsional moment: 1.5kg/cm Working voltage: 4.2V-6V Temperature range: 0℃-55℃ Operating speed: 0.1 seconds /60° Dead band width: 10 microseconds The maximum rotation angles of left and right are around the same. 2.4 4WD Driver Motor Robot Smart Car Chassis Kits With the car platform, adding micro-controller (such as Arduino) and sensor modules, then program it, a robot car comes up.
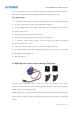
Smart WIFI Robot Car Kit for Arduino 2.4.1 Contents 4pcs Wheels 4pcs Geared Motors (1:48) 8pcs T-type Fastener 1pcs 18650 Battery Container 1pcs Acrylic Car Chassis Screws+ Nuts 2.5 Line Tracking Module The line tracking module detects lines in the surrounding environment, and transfers the data to the processor. The processor analyzes the data, and sends a command to control the movement of the wheels. 2.5.
Smart WIFI Robot Car Kit for Arduino 2.6 WIFI Module Kit The wifi module kit includes two parts, one is the core board, and the other is the wifi adapter board. It is used to send control command to the car and transmits the real-time camera image to the smart phone. 2.6.1 Specification: The wifi core board: Support OS: Openwrt (linux) Working voltage: 3.3V ± 10% Average power consumption: 0.
Smart WIFI Robot Car Kit for Arduino With wifi antenna Item dimension: 46mm X 44mm 2.7 Camera You can take a picture or record a video through the camera stuck in the Pan/Tilt/Zoom and connected with two 9g micro servo motor, thus giving better shooting experience when you're using it on the smart car kit. 2.7.1 Specification: 5 megapixels image sensor OV5640 Support for JPEG output format Interface: usb2.0 Item size: 28mm X 28mm 13 www.uctronics.
Smart WIFI Robot Car Kit for Arduino 3. Pin Definition Arduino UNO R3 Board L293D Motor Drive Expansion Board 14 www.uctronics.
Smart WIFI Robot Car Kit for Arduino 4. Wiring 15 www.uctronics.
Smart WIFI Robot Car Kit for Arduino 5. Installation A pre-introduction of the servo installation: 90° For the bottom servo, you should calibrate to the center position manually. The servo can turn 180 degrees, you shoud set it to center position so that you can turn left 90 degrees and turn right 90 degrees. Below middle picture shows the center position.
Smart WIFI Robot Car Kit for Arduino 5.1 Installation of the Car Step 1: Install the deceleration DC motor 17 www.uctronics.
Smart WIFI Robot Car Kit for Arduino Step 2: Fix the wheel 18 www.uctronics.
Smart WIFI Robot Car Kit for Arduino Step 3: Install the UNO board 19 www.uctronics.
Smart WIFI Robot Car Kit for Arduino Step 4: Install the L293D motor drive board 20 www.uctronics.
Smart WIFI Robot Car Kit for Arduino Step 5: Install the wifi adapter board 21 www.uctronics.
Smart WIFI Robot Car Kit for Arduino Step 6: Install the wifi core board 22 www.uctronics.
Smart WIFI Robot Car Kit for Arduino Step 7: Install the battery container 23 www.uctronics.
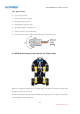
Smart WIFI Robot Car Kit for Arduino Step 8: Install the servo motor to the PTZ base 24 www.uctronics.
Smart WIFI Robot Car Kit for Arduino 25 www.uctronics.
Smart WIFI Robot Car Kit for Arduino Step 9: Install the PTZ to the chassis 26 www.uctronics.
Smart WIFI Robot Car Kit for Arduino Step 10: Install the PTZ brackets to the servo motor 27 www.uctronics.
Smart WIFI Robot Car Kit for Arduino Step 11: Install the servo motor to the PTZ brackets 28 www.uctronics.
Smart WIFI Robot Car Kit for Arduino Step 12: Install the PTZ bracket to the servo motor 29 www.uctronics.
Smart WIFI Robot Car Kit for Arduino Step 13: Install the camera module to the PTZ brackets 30 www.uctronics.
Smart WIFI Robot Car Kit for Arduino Step 14: Install the ultrasonic sensor to the ultrasonic holder 31 www.uctronics.
Smart WIFI Robot Car Kit for Arduino Step 15: Install the ultrasonic module to the chassis 32 www.uctronics.
Smart WIFI Robot Car Kit for Arduino Step 16: Install the line tracking module 33 www.uctronics.
Smart WIFI Robot Car Kit for Arduino 5.2 Wire Connection Connect the micro servo motor to the L293D motor drive expansion board 34 www.uctronics.
Smart WIFI Robot Car Kit for Arduino Connect the camera module to the wifi adapter board 35 www.uctronics.
Smart WIFI Robot Car Kit for Arduino Connect the ultrasonic sensor module to the L293D motor drive expansion board 36 www.uctronics.
Smart WIFI Robot Car Kit for Arduino Connect the line tracking module to the L293D motor drive expansion board 37 www.uctronics.
Smart WIFI Robot Car Kit for Arduino Connect the DC motor to the L293D motor drive expansion board 38 www.uctronics.
Smart WIFI Robot Car Kit for Arduino Connect the battery container to the L293D motor drive expansion board 39 www.uctronics.
Smart WIFI Robot Car Kit for Arduino Connect the wifi core board with the wifi adapter board 40 www.uctronics.
Smart WIFI Robot Car Kit for Arduino 6. Start Programing 6.1 Install Arduino IDE Step 1: Go to the arduino.cc website and click Software. On the page, check the software list on the right side under Download the Arduino Software Find the one that suits your operation system and click to download. There are two versions of Arduino for Windows: Installer or ZIP file. You're recommended to download the former Step 2: Press the button ‚JUST DOWNLOAD‛ to download the software 41 www.uctronics.
Smart WIFI Robot Car Kit for Arduino Step 3: Double click the .exe file and the following window will show up. Click ‚I Agree‛ Next 42 www.uctronics.
Smart WIFI Robot Car Kit for Arduino Step 4: Click ‚Browse‛ to choose the installation path or enter a directory at the Destination Folder. Click ‚Install‛ to initiate installation Step 5: After the installing progress bar goes to the end, the ‚Close button‛ may be enabled for some PC. Just click it to complete the installation 43 www.uctronics.
Smart WIFI Robot Car Kit for Arduino Step 6: Then a prompt appears. Select Always trust software for "Adafruit Industries" and click ‚Install‛ Step 7: After the installation is done, click Close. Then an Arduino icon will appear on the desktop: 44 www.uctronics.
Smart WIFI Robot Car Kit for Arduino 6.2 Add Libraries Step 1: Download and unzip the file https://github.com/UCTRONICS/WIFI_Camera_Smart_Robot_Car.git Step 2: Open the documents ‚WIFI_Camera_Smart_Robot_Car-master‛ 45 www.uctronics.
Smart WIFI Robot Car Kit for Arduino And then, Copy ‚RobotCar‛ to .. \ Arduino \ libraries (under the installation path of Arduino) Step 3: Open Arduino IDE, click ‚Tools‛ -> ‚ Board: Arduino/Genuino Uno‛ -> ‚Arduino/Genuino Uno‛ 46 www.uctronics.
Smart WIFI Robot Car Kit for Arduino Step 4: Click ‚Tools‛ to select the serial port Step 5: Click ‚File‛ -> ‚Examples‛ -> ‚RobotCar‛ -> ‚WIFI_Camera_Robot_Car‛ to select the library 47 www.uctronics.
Smart WIFI Robot Car Kit for Arduino Step 6: Compile and upload Note: Before you compile the code, please read the demo explanation first. Any questions, please refer to our trouble shooting link: https://github.com/UCTRONICS/WIFI_Camera_Smart_Robot_Car/blob/master/APP_Controll er/TroubleShooting.md 48 www.uctronics.
Smart WIFI Robot Car Kit for Arduino 7. RobotCar App for Android The app is specially designed for Uctronics wifi smart robot car. It can control the movement of the car, avoid the obstacles, start line tracking, adjust the camera direction, take photos and videos. 7.1 Download and Install App https://github.com/UCTRONICS/WIFI_Camera_Smart_Robot_Car/raw/master/APP_Controller/RobotCar.apk 7.
Smart WIFI Robot Car Kit for Arduino As the picture shows the ‘UCTRONICS’ hotspot If connect successful, the app will remind you ‘Connect successfully!’ Now you will see the scene from the car’s camera. At the same time, you can operate the joystick on the screen to control the car. The left joystick is to control servo and the right joystick is to control the motor. 7.3 Function introduction You can take a picture or record a video or make a speaker work.
Smart WIFI Robot Car Kit for Arduino Basic setup After click the setting button, you can configure the Image path/Video path/IP Address (192.168.1.1)/Control port (2001) and Video Port.as normal you should not change the default IP Address /Control port and Video port Calibration and speed setting You can change the value of Froward to compensate for the speed difference of the motor. You can change the value of basic speed to control the motor speed. Exit the application 51 www.uctronics.
Smart WIFI Robot Car Kit for Arduino [Notice] 1. When using the function of taking picture or recording video, you need to get the right to read or write the memory. The detail steps are as follows: 2. The video still does not display even if ‘Connect successfully’ is appeared, and the problem can’t be settled down through refresh. That may be caused by a low Android version. At this moment, you can click ‘Setting’ and choose ‘DISPLAY_MODE’ to change the mode to 2.