
User Manual
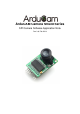


ArduCAM Camera Shield Software Application Note
www.ArduCAM.com
9
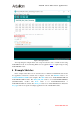
This example illustrates how to send continues capture commands to ArduCAM and transfer
the JPEG image data back to host application via Arduino onboard USB-Serial interface. Note that
the higher resolution wills cause higher image size and reduce the streaming frame rate
accordingly. These examples should work with host application to view the captured images.
4.1.13 ArduCAM_Mini_Capture2SD
This example demonstrates how to capture time elapse image and save to TF/SD card.
4.1.14 ArduCAM_Mini_Video2SD
This example demonstrates how to capture low resolution and low frame rate MJPEG video
to AVI file.
4.1.15 ArduCAM_Mini_5MP_Plus_OV5642_RAW
This example demonstrates how to capture picture in RAW format using Mini 5MP plus
4.1.16 ArduCAM_Mini_5MP_Plus_short_movie_clip
This example illustrates how to record short movie clip by capturing continuous JPEG
images until the entire 8MByte frame buffer is full, then save the MJPEG images as an AVI file
into TF/SD card. You can playback the avi file on your PC media player software.
4.1.17 ArduCAM_Mini_5MP_Plus_Multi_Capture2SD
This example illustrates how to capture continuous pictures then save to TF/SD card, the
maximum allowed pictures numbers is limited to 7. This example is useful if you want to create
HDR image with different exposure value by manually set different exposure value at the
beginning of each frame.
4.2 ArduCAM REVC Examples
The REVC folder contains examples for ArduCAM Rev.C and Rev.C+ shield. It requires
additional UTFT4ArduCAM_SPI library as mentioned earlier. All of the examples are designed
for different camera modules, and will take effect automatically according to the Macro definition
in the memorysaver.h file.
4.2.1 ArduCAM_REVC_Camera_Playback
This example captures a 320x240 resolution BMP file and stores into SD card memory, then
playback captured image on LCD screen if press the shutter button more than 3 seconds.
4.2.2 ArduCAM_REVC_Digital_Camera
This example acts like a true point to shoot digital camera. It starts live preview on LCD
screen, and captures high resolution JPEG image after press the shutter button. Note that the
image size has to fit into the onboard frame buffer size in order to prevent buffer overflow.
4.2.3 ArduCAM_REVC_Video_Streaming
Similar to ArduCAM-Mini example, see section 4.1.4.
4.2.4 ArduCAM_REVC_Capture2SD
Similar to ArduCAM-Mini example, see section 4.1.13.
4.2.5 ArduCAM_REVC_Video2SD
Similar to ArduCAM-Mini example, see section 4.1.14.
4.3 ArduCAM Shield V2 Examples
Similar to ArduCAM Shield Rev.C/Rev.C+ and ArduCAM-Mini-5MP-Plus examples, the
examples in this folder is designed for ArduCAM-Shield-V2 with additional performance and
features. All of the examples are designed for different camera modules, and will take effect
automatically according to the Macro definition in the memorysaver.h file. And examples also