Instruction Manual DZ-HV575E
Precautions Safety Instruction Do not store the camera to intense heat or cold for long periods of time, as this may result in permanent damage to the camera. Do not use or store the product in dusty, dirty, or sandy areas, as its components may be damaged. Do not drop, puncture or disassemble the camera. High-voltage internal components create the risk of electric shock when exposed. Use the camera with care. Rough handling may damage the internal components.
SOME DOS AND DON’TS ON THE SAFE USE OF EQUIPMENT This equipment has been designed and manufactured to meet international safety standards but, like any electrical equipment, care must be taken if you are to obtain the best results and safety is to be assured. ******************************************* DO read the operating instructions before you attempt to use the equipment.
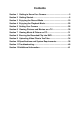
Contents Section 1 Getting to Know Your Camera............................................ 5 Section 2 Getting Started..................................................................... 8 Section 3 Enjoying the Record Mode ............................................... 10 Section 4 Enjoying the Playback Mode ............................................ 20 Section 5 Setting Your Camera ........................................................ 26 Section 6 Viewing Pictures and Movies on a TV ...............
Section 1 Getting to Know Your Camera Overview The camera with 5 Mega Pixel sensor can take H.264 movies. By way of using H.264 technology, more videos can be taken within certain amount of memory. High quality images with up to 12 mega-pixels can also be delivered smoothly. With a color LCD monitor, users can compose images and examine them easily. The camera features 3” LCD touch panel which is an ideal platform for you to operate your camera.
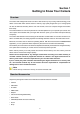
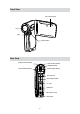
Front View LCD Touch Panel Lens Light Power Button Rear View Playback LED Indicator Record LED Indicator Tele/Wide Button Movie Shutter Button Picture Shutter Button Five-way Key Record/Play Button TV Port HDMI Port Mini USB 2.
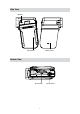
Side View Speaker Battery Cover Microphone Bottom View SD card Slot 7 Tripod Socket
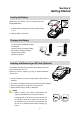
Section 2 Getting Started Loading the Battery Before using the camera, users must load Lithium-ion rechargeable battery 1. Insert the battery following to the correct polarity marks ( + or -). 2. &ORVH WKH EDWWHU\ FRYHU ¿UPO\ Charging the Battery You must use the supplied AC charger or USB cable. Camera must be turned OFF; blinking OLJKW FRQ¿UPV FKDUJLQJ EXW OLJKW LV constant when charging has been completed.
Turning the Camera On and Getting Started To turn on the camera: 1. Flip out the LCD panel; the camera will turn on automatically. 2. Or press Power Button for one second to turn on it. To take a movie: Press the Movie Shutter Button ( ). ) halfway down till the focusing frame turns To take a picture: Press the Picture Shutter Button ( from white to green. Then, press the Picture Shutter Button fully down to take picture.
Section 3 Enjoying the Record Mode Button/Key Function Five-way key: Right Key: Digital Light On/Light On/ Light OFF Left Key: Self timer ON/OFF Up Key:LCD Information ON (Show the indicators on the LCD screen) / OFF (Do not show the indicators on the LCD screen) SET Key: Menu On. Validate the setting Tele Button : Zoom In Wide Button : Zoom out Power Button: Press down for one second to turn on or turn off the camera Record/Play Button functions: 1. Switch between Record /Playback Mode 2.
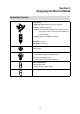
LCD Monitor Information The indicators shown below may display on LCD when movies and pictures are recorded: Movie Resolution HD (1080p) (30fps) HD (720p) (30fps) WVGA (60fps) VGA (30fps) (1) QVGA (30fps) Picture Resolution High Standard Low Number of images that can still be taken at current resolution (2) Recording time of movie that can still be taken at current resolution Digital light On (3) Light On (4) Self-timer enabled 11
(5) Motion Detection (6) Option menu On Scene Skin (7) Night Backlight (8) Macro Position Focusing (9) Manual White Balance (10) SD Card inserted Battery: full power Battery: medium power (11) Battery: low power Battery: power empty Zoom meter: HD(1080p):1X~5X (5X Optical zoom and 1X Digital zoom) (12) Other video resolution:1X~20X (5X Optical zoom and 4X Digital zoom) (13) Stabilization Note Scene: B/W / Classic / Nagative effect can be previewed immediately without indicator on the LCD Movi
WVGA (60fps) VGA (30fps) QVGA (30fps) Picture Recording Press the Picture Shutter Button ( ) halfway down till the focusing frame turns from white to green. Then, press the Picture Shutter Button fully down to take picture. Press RECORD/PLAY Button to view the picture. Three resolution settings are available: Image Quality High Quality:12 Mega Pixels Standard Quality:5 Mega Pixels Low Quality:3 Mega Pixels Using Digital Light or Light Function To use light function: 1.
Options for Record Menu Movie Mode Picture Mode Resolution Resolution Effect Macro Mode Stabilization Scene Motion Detect WB (White Balance) ISO Operations for Record Mode Operation Screen 1. Touch (on-screen icon) when in Record Mode. The Record menu will show on the screen. 2. Touch the option icons on the screen lightly with your ¿QJHU WR PRYH EHWZHHQ PDLQ PHQX RSWLRQV ZKLFK DUH Movie Mode, Picture Mode, and Effect. 3.
Movie Mode Submenu Setting Operation 1. In Record Mode, touch Display Screen (on-screen icon) to enter record menu screen. 2. Touch [Movie Mode] icon on the screen. Submenu of Movie Mode will pop out on the screen. 3. The Movie Mode submenu contains 3 options-Resolution, Stabilization, and Motion Detect--for you to adjust the camera setting. Movie Resolution Operation Display Screen 1. In Movie Mode submenu, touch [Resolution] on the screen. 2. Touch RQ WKH VFUHHQ WR PRYH EHWZHHQ ¿YH settings. 3.
Motion Detection Operation Display Screen 1. In Movie Mode submenu, touch [Motion Detect] on the screen. 2. Touch on the screen to choose On or Off. 3. Touch OK icon to validate the setting then touch exit icon ( ) to back to Record mode. 4. Camera will start to record video automatically if it detects a movement. Stop recording if it does not detect a movement.
Picture Mode Submenu Setting Operation 1. In Record Mode, touch Display Screen (on-screen icon) to enter record menu screen. 2. Touch [Picture Mode] icon on the screen. Submenu of Picture Mode will pop out on the screen. 3. The Picture Mode submenu contains 1 option, Resolution,for you to adjust the camera setting. Picture Resolution Operation Display Screen 1. In Picture Mode submenu, touch [Resolution] on the screen. 2. Touch on the screen to move between three settings. 3.
Effect Submenu Setting Operation Display Screen 1. In Record Mode, touch (on-screen icon) to enter record menu screen. 2. Touch [Effect] icon on the screen. Submenu of Effect will pop out on the screen. 3. The Effect submenu contains 4 options--Macro Mode, Scene, WB, and ISO--for you to adjust the camera setting. 4. Touch / on the screen to change the page. Macro Mode With Macro Mode set to Macro, you could take closer movies/images of objects in distance of 1cm to 80cm. Operation Display Screen 1.
WB (White Balance) The camera adjusts the color balance of images automatically. Three manual white balance settings are available: Auto: The camera automatically adjusts white balance. Daylight: Under outdoors. Fluorescent: 8QGHU ÀXRUHVFHQW OLJKW FRQGLWLRQ Tungsten: Under tungsten light condition. Operation Display Screen 1. In Effect submenu, touch [WB] on the screen. on the screen to move between 2. Touch 4 settings. The change can be previewed immediately. 3.
Section 4 Enjoying the Playback Mode Button/Key Function The Buttons/Keys have the following functions in Movie and Picture Playback Modes. Five-way Key: Right Key: Go to the next movie/picture. Fast forward Left Key: Go to the previous movie/picture. Fast rewind Up Key: Volume increase. Information ON/OFF Down Key: Volume decrease. Delete the current or all movies/pictures SET Key: 1. Validate the setting. 2. In Movie Playback Mode, press to select the current movies to upload to YouTube. 3.
LCD Monitor Information Indicators on the LCD screen while in Playback Mode: Movie Playback Mode Picture Playback Mode HD (1080p) (30fps) HD (720p) (30fps) WVGA (60fps) VGA (30fps) (1) QVGA (30fps) High Standard Low (2) Current number/ Total number of movie.
(13) Exit Slideshow (14) Slideshow stop Consecutive number of picture (15) Operations for Playback Mode The Playback Mode is for viewing and managing movies and pictures on the built-in memory or on an SD card. Operation Display Screen ) to switch from 1. Press RECORD/PLAY Button ( Record Mode to Playback Mode Main Menu.There are 2 options in the Playback Mode, Movie and Picture. 2. 7RXFK WR VHOHFW WKH VSHFL¿F RSWLRQ Movie Playback Operation Display Screen 1.
Delete Movies Operation 1. Touch 2. Touch 3. / Display Screen to select the movies. to go to the Delete option screen. Touch [Yes] to delete the current movies or [No] to cancel the operation and exit; touch [All] to delete all movies. 4. %HIRUH DOO PRYLHV DUH GHOHWHG D FRQ¿UPDWLRQ screen will appear; touch [Yes] to execute the operation and [No] to cancel the operation. Note If a memory card is inserted, you can delete only those movies stored on the card.
Picture Playback Operation Display Screen 1. Touch [Picture] on the screen to enter Picture Playback Mode. 2. Sweep to the left or touch to go to the previous picture; sweep to the right or touch to go to the next picture. 3. While the picture is selected,press on the screen as well as go up to enter 0DJQL¿FDWLRQ 0RGH In the 0DJQL¿FDWLRQ 0RGH press on the screen as well as go up to zoom in or go down to zoom out. 4.
Delete Picture Operation 1. Touch 2. Touch / Display Screen to select the picture. to go to the Delete option screen. 3. Touch [Yes] to delete the current picture or [No] to cancel the operation and exit; touch [All] to delete all pictures. 4. %HIRUH DOO SLFWXUHV DUH GHOHWHG D FRQ¿UPDWLRQ screen will appear; touch [Yes] to execute the operation and [No] to cancel the operation. Note If a memory card is inserted, you can delete only those pictures stored on the card.
Section 5 Setting Your Camera Setting Menu Operation 1. In Record Mode, Press Display Screen (on-screen icon) to enter record menu screen. 2. Touch [Setting] icon on the screen. Submenu of Setting will pop out on the screen. 3. The Setting submenu contains 6 options for FRQ¿JXULQJ \RXU FDPHUD VHW XS 7KH\ DUH 6RXQG (operation sound), TV, Language, Format, Time Setting, and Default Setting. 4. Touch / on the screen to change the page. Sound Enable or disable KeyPad tone and operation sound.
TV Ensure that the appropriate TV standard of your area is selected – either NTSC or PAL. :URQJ 79 V\VWHP VHWWLQJ PD\ FDXVH LPDJH ÀLFNHU NTSC standard: USA, Canada, Japan, South Korea and Taiwan etc. PAL standard: UK, Europe, China, Australia, Singapore and Hong Kong etc. Operation Display Screen 1. In Setting submenu, touch [TV] on the screen. on the screen to choose NTSC(60Hz) 2. Touch or PAL(50Hz). 3. Touch OK icon to validate the setting then touch exit icon ( ) to back to Record mode.
Format Yes: Format the built-in memory ( When there is no SD card in the camera ) / SD Card (When there is an SD card in the camera). No: Do not format the built-in memory ( When there is no SD card in the camera ) / SD Card (When there is an SD card in the camera). Operation Display Screen 1. In Setting submenu, touch [Format] on the VFUHHQ WR JR WR WKH IRUPDW FRQ¿UPDWLRQ VFUHHQ 2. Touch [Yes] to execute the operation and [No] to cancel the operation.
Default Setting To restore the default factory setting, select this option. Operation Display Screen 1. In Setting submenu, touch [Default Setting] on the VFUHHQ WR JR WR WKH 'HIDXOW 6HWWLQJ FRQ¿UPDWLRQ screen. 2. Touch [Yes] to execute the operation and [No] to cancel the operation.
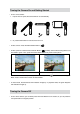
Section 6 Viewing Pictures and Movies on a TV &RQQHFWLQJ WR D +LJK 'H¿QLWLRQ :LGH 79 1. Connect one end of the HDMI cable to your camera’s HDMI out port. 2. Connect the other end of the cable to a television. 3. Set video input source of a TV to “ HDMI” option. 4. Use buttons/keys to view stored pictures and movie on a TV. 1. Use Right/Left Keys to go to the next or last movie/picture. 2. Press Movie Shutter Button to play movies and press it again to pause. 3.
Section 7 Viewing Movie & Picture on PC Installing Bundled Software The CD-ROM supplied with this camera contains 2 pieces of software. ArcSoft MediaImpression is a user-friendly application that helps you managing your media, burning your video into DVD, and uploading your videos to YouTube easily. Adobe Reader is a popular program that you need to have installed to read the User’s Manual.
Section 8 Burning the Recorded Clip into DVD Bundled software CD contains ArcSoft MediaImpression features burning the movie clip into DVD. You can share this DVD movie with family and friends by using regular DVD player. To create a DVD: 1. Install ArcSoft MediaImpression (Refer to Section 7). 2. Click Windows [ Start ] J[ (All) Programs ] J[ ArcSoft MediaImpression ]. 3. ArcSoft MediaImpression main Screen will appear on your desktop. 4. Click [ Make Movie ] .
5. The operation screen will appear: 6HOHFW WKH IROGHU WKDW FRQWDLQV WKH YLGHR ¿OHV \RX ZDQW WR EXUQ 6HOHFW WKH ¿OH V &OLFN EXWWRQ WR DGG WKH ¿OHV LQWR VOLGH Click [Burn to Disc]. 1 2 3 4 6. Click [ Start ] to start DVD burning.
Section 9 Uploading Video Files to YouTube The built-in YouTube Direct application offers you an easy way to upload your video clips to YouTube instantly. It helps you share them with your family and friends on YouTube website. 7R XSORDG YLGHR ¿OHV WR
4. Preview the video: double click on the video clip in thumbnail screen. Click Play/Pause icon to play/pause. Click Return icon to back to thumbnail preview screen. 5. Upload video cilp (1) Upload single video clip or selected video clips:In thumbnail screen,click up/down icon to change the pages. Click on the video clip you want to upload (+ Ctrl Button to select two or more video clips), and then click [Upload selected videos to youtube] icon.
6. Fill in the information in the blanks. 7. ,I \RX GR QRW KDYH D 6LJQ8S@ WR UHJLVWHU D QHZ
8. Click [Upload Videos] to upload the video(s).
Section 10 6SHFL¿FDWLRQV DQG 6\VWHP 5HTXLUHPHQWV 6SHFL¿FDWLRQ Image sensor 5 Mega pixel CMOS sensor Operation modes Movie record, Picture record Lens F3.5 - 3.7 (f = 6.
6\VWHP UHTXLUHPHQWV Microsoft Windows 2000/XP/Vista/7 Intel Pentium III 800MHz or above 256 MB RAM CD-ROM Drive 700 MB free HDD space Available USB port 16-bit Color Display Note The LCD screen is manufactured using extremely high-precision technology so over 99.99% of the pixels are operational for effective use. However, some tiny black and/or bright dots (white, red, blue or green) may appear on the LCD screen.
Section 11 Troubleshooting Troubleshooting 1. If the LCD image is not clear when shooting, how can the focus be adjusted? Try to switch between Macro and Normal Mode. (Macro Mode: For object in distance about 1cm to 80cm, Normal Mode: For object in distance beyond 10cm) 2. The light is not working. The battery power is low. 3. 7KH ¿OHV RQ WKH PHPRU\ FDUG GR QRW GLVSOD\ VPRRWKO\ ZKHQ WKH /&' VKRZV WKH ³ ´ PDUNLQJ The “!” means the SD card is low speed or having wrong content inside.
Section 12 Additional Information Regulatory Information The above mark is in compliance with the Waste Electrical and Electronic Equipment Directive 2002/96/ EC (WEEE). The mark indicates the requirement NOT to dispose the equipment including any spent or discarded batteries as unsorted municipal waste, but use the return and collection systems available.
Used correctly, domestic batteries are a safe and dependable source of portable power. Problems can occur if they are misused or abused — resulting in leakage or, in extreme cases, fire or explosion. Here are some simple guidelines to safe battery use designed to eliminate any such problems. ALWAYS BATTERY SAFETY GUIDELINES ALWAYS Store unused batteries in their packaging and away from metal objects which may cause a short-circuit resulting in leakage or, in extreme cases, fire or even an explosion.
ARGOS Product Guarantee This product is guaranteed against manufacturing defects for a period of 1 Year This does not cover the product where the fault is due to misuse, abuse, use in contravention of the instructions, or where the product KDV EHHQ WKH VXEMHFW RI XQDXWKRULVHG PRGL¿FDWLRQV RU DOWHUDWLRQV RU has been the subject of commercial use In the event of a problem with the product within the guarantee period please return it to your nearest Argos store If the item is shown to have had an inherent