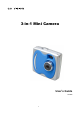
3-in-1 Mini Camera User’s Guide 16-3868 1
GETTING STARTED About the 3-in-1 Mini Camera Congratulations on your purchase of the 3-in-1 Mini Camera. Your Mini Camera has been ergonomically designed to let you quickly and easily capture quality digital images and short video clips without the trouble and expense of buying and developing film. With a 1.3 Mega-Pixel image sensor, you are assured of clear images that can be printed, displayed on a web site, or sent to friends and family through e-mail. The 1.
Table of Contents GETTING STARTED .................................................................................................................................................2 ABOUT THE 3-IN-1 MINI CAMERA .......................................................................................... 2 What’s Included ............................................................................................................ 2 CAMERA FEATURES ................................................................
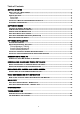
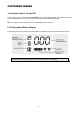
Camera Features Front View Rear View 4
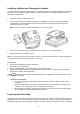
Installing a Battery and Changing a Faceplate Your Mini Camera requires one AAA battery (not supplied) for power. For the best performance and longest battery life, we recommend an alkaline battery. Your mini camera also comes with two additional color faceplates for replacement. 1. Slide off the battery compartment cover. 2. If you need to replace the faceplate, insert the tip of a ballpoint pen into the hole inside the battery compartment to push the faceplate out of the camera.
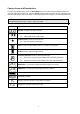
CAPTURING IMAGES Turning the Camera On and Off To turn on the camera, hold down the Power/Mode button until on displays briefly. The camera beeps once, and then 000 appears. To turn off the camera, hold down the Power/Mode button again. Note: Your Mini Camera automatically turns off after 60 seconds of inactivity. LCD Information/Status Display The following icons are used in the Information/Status LCD display to present mode and setting options.
Camera Icons and Descriptions To select your desired setting, press the Power/Mode button to scroll through the different modes. The icons will display in the status LCD. Press the Shutter button to select a function while it is displayed. The camera is now ready to capture an image or streaming snapshots according to your selected preferences. Note: If you do not press any button within five seconds, the LCD screen automatically returns to the operational mode screen – ready to capture an image.
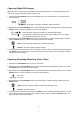
Capturing Digital Still Images Note: Be sure the camera has enough battery power before taking pictures. Observe the battery power indicator and replace the battery when its power is low. 1. Hold down the Power/Mode button until on displays briefly. The camera beeps once and the function screen displays. Default Setting (No images, indoor light, full battery, highest resolution) 2.
Deleting Images and Videos The Delete function allows you delete images or video clips saved in the internal memory of your mini camera. Repeatedly press the Power/Mode button until the desired Delete mode displays. Delete ALL images and Videos: To delete all images and video clips, hold down the Shutter button until you hear 2 beeps. Delete the LAST image or video capture: To delete the last image or video clip, hold down the Shutter button until you hear 2 beeps.
SOFTWARE INSTALLATION System Requirements Windows • • • • • • Windows 98, 98SE, ME, 2000, or XP 200 MHz Pentium or better 64MB RAM 310MB available Hard Drive space CD-ROM USB Port Software Overview & Features The supplied CD includes the following software and applications to enhance your digital imaging experience. The Picture Manager (TWAIN) software helps you download the images and video from your digital camera to your computer.
Installing the Digital Camera Driver Software Note: (For Windows 98SE users ONLY!) You may encounter a message during software installation due to an old version of DirectX installed on your computer. Select “No” and continue with the installation. This will not affect the operation of your computer. 1. Insert the DIGITAL CAMERA software CD into your CD-ROM drive. The CD runs automatically, and the DIGITAL CAMERA installation menu displays. Click “Digital Camera Driver”.
4. When the installation is complete, click “Finish”. Installing the PhotoImpression 5 and VideoImpression 2 Note: For more information about PhotoImpression 5 and VideoImpression 5, please visit the Arcsoft Web site at www.Arcsoft.com 1. Go to the “Digital Camera” screen and click on “ArcSoft Software Suite”. 2. Follow the on-screen instructions to complete installing the ArcSoft sofware.
CONNECTING TO YOUR PC Connecting Your Mini Camera to Your PC Note: Before you connect your mini camera to your PC, you must have installed the TWAIN driver. 1. Hold down the Power/Mode button to turn off the camera. 2. Lift up the USB port cover. 3. Plug the smaller connector of the USB cable into your camera’s USB port. 4. Plug the larger connector of the USB cable to your computer’s USB port.
To Windows XP users only: When the camera is connected to your PC for the first time, the computer will recognize the new device and display a “Found New Hardware” message. You must wait while the computer identifies your camera. If you have already installed the software, the information window will display the name of the device connected. If you have not installed the software, disconnect the camera from your computer and follow the directions under “Installing the Digital Camera Driver Software”.
DOWNLOADING IMAGES AND VIDEOS TO YOUR PC Using the TwainApp to Transfer Images and Videos Note: Before you connect the camera to your PC, you must install the TWAIN driver. 1. Click Start, Program, and Mega Pixel Camera (8105 SXGA), and then TwainApp. 2. Click on “Get DSC” to browse the pictures in the camera. 3. Click on “Download” to download the pictures. 4. When you complete downloading, click on “Transfer All” and then select a path to store the pictures.
Using PhotoImpression 5 to Transfer Images Follow the instructions below to transfer the pictures using PhotoImpression 5. 1. Launch PhotoImpression 5 application: Start → Programs → Arcsoft Software Suite → PhotoImpression 5 2. Select “Camera/Scanner” and then click “Mega Pixel Camera (8105 SXGA)”. Then the TwainApp will be called out for you to transfer images and videos. 3. The Picture Manager allows you to view each individual image saved on your camera.
USING YOUR MINI CAMERA AS A PC/WEB CAMERA You also can use your mini camera as a PC/Web camera. Use the supplied USB cable to connect your mini camera to your PC. The camera turns on automatically. Then, place your mini camera on the top of your monitor or any level surface at a higher position to let the camera lens face the computer user.
V I D E O C ONF E R E NC I NG W I T H NE T M E E T I NG How to Use your mini camera with Microsoft NetMeeting Your Mini Camera can be used with Microsoft NetMeeting. Follow these instructions: 1. Connect your mini camera to your computer using the USB cable. The camera turns on automatically. 2. Go to Start > Programs > Accessories > Communications > NetMeeting to launch NetMeeting. 3. When the NetMeeting screen displays, click the Tools menu, select Video and click “Send”.
QUI C K T I P S Capturing Images Indoors – General Tips • • • • • • • • • Try to capture images in an area full of colors and patterns. If taking a picture of a person, make sure the clothing does not have a high contrast to the background (e.g. white shirt against black background). Depending on the subject and the indoor conditions, it is generally better to have the light source at an angle (e.g. 45 degrees) from the subject instead of directly in front of or directly behind the subject.
SPECIFICATIONS Specifications are typical; individual units might vary. Specifications are subject to change and improvement without notice. Individual units may vary. Image Sensor 1.3M Pixels (1280x1024) CMOS Sensor Lens Specification F 2.8, f = 8.79 mm (43mm Equivalent to 35mm Film) Focusing Fixed Focus 0.9m ~ infinity Shutter 1/15~1/1500 sec. (Electronic Shutter) Auto Control Viewfinder Virtual Type: Optical, Magnification 0.
TROUBLESHOOTING Problem Possible cause Solution The camera has no power. The battery is depleted. Replace the battery with a new one. The battery is inserted incorrectly. Check the battery’s polarity orientation. Is the camera connected to a computer? The camera’s buttons do not work when the camera connects to a PC. Disconnect the camera. Is the camera turned on? The camera turns off automatically after approximately one minute. Make sure the camera’s power is turned on before taking an image.
The FCC Wants You to Know This equipment has been tested and found to comply with the limits for a Class B digital device, pursuant to Part 15 of the FCC Rules. These limits are designed to provide reasonable protection against harmful interference in a residential installation. This equipment generates, uses and can radiate radio frequency energy and, if not installed and used in accordance with the instructions, may cause harmful interference to radio communications.