
User Guide


- 5 -
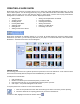
ARRANGING PHOTOS
Once your photos have been added, you'll probably want to arrange the order in which they appear. Simply click
and drag a photo from one location to another.
ROTATING PHOTOS
If a photo is oriented incorrectly, click it to highlight it, and then click either of the "Rotate" buttons until the photo is
oriented the way you want.
INSERTING BLANK SLIDES
You may want to include plain, blank slides at various spots in your slide show. They can be used as
backgrounds for adding text for introductions, breaks, credits, etc.
To add a blank slide, click the "Add Blank Slide" button. A blank slide will appear before the currently selected
slide (of course, you're free to click and drag it to any location). To change the color of a blank slide, right-click it
and choose "Background Color." You can then select from a broad color palette.
ATTACHING AUDIO
Later you'll be able to add audio files that play over your entire slide show, just like a movie soundtrack. For now,
you can attach sound files to specific slides. This is ideal for narration. You can add audio commentary to each
slide, and then later add music over the entire slide show.
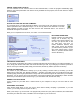
To attach audio to a specific slide:
1. Highlight the slide.
2. Click the "Audio Annotation" button and choose either "Attach Audio" or "Record Audio." If you would like
to attach an audio file, go to step 3. If you would like to record audio (for example, voice narration), skip to
step 4.
3. When attaching audio, a standard Open dialog will appear. Navigate to the directory that contains the file
you want, highlight the file, and click "Open."
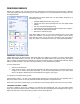
4. Basic record and playback controls are available so you can capture narration or other audio. Click
"Format" to view and edit the audio properties. When you're finished recording, click "Save."
A speaker icon will appear on the slide once you attach audio.
To detach any audio, highlight the slide, click "Audio Annotation," and choose "Detach Audio."
EDITING PHOTOS
Highlight the photo you want to modify and click "Edit Photo." (See the "Editing Photos" chapter.)