
User Guide


- 10 -
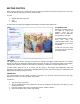
EDITING PHOTOS
When creating a slide show, you have the option of editing your photos to ensure they look perfect for your DVD.
You can do all sorts of simple yet effective enhancements.
You can:
• Brighten and alter image color
• Crop
• Add Text
To edit a photo in a slide show, highlight the thumbnail you want and click "Edit Photo."
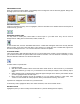
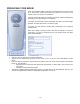
ALTERING COLOR
Enhancing a photo's color is
as simple as clicking and
dragging. There are two
sliders: one for brightness,
and another for color tone.
To brighten/darken a photo,
click and drag the
"Darken/Lighten" slider. You'll
see the effects on your photo
immediately.
To alter the color tone, check
the "Color Tone" box and click
and drag the slider.
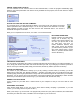
CROPPING
Like brightening your photos, cropping can be done by clicking and dragging. Notice that there is a marquee
around your photo. By clicking and dragging either the corners or sides, you can alter the shape of the marquee.
Click and drag within the marquee to move it around. Everything outside of the marquee will be removed.
For best results, check the "Fit to TV screen" box. By doing so, the program will automatically adjust the
proportion of the marquee to match that of a standard television screen. This ensures that your cropped photo will
display perfectly when you play your movie.
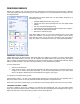
ADDING TEXT
Text can be added to the top, middle, or bottom of your photo. You have full control over the font, size, style,
alignment, and color. You can even add a drop shadow.
To add text:
1. Type your text in the text box.
2. Use the available buttons and pull-downs to set the text properties. By clicking the color wheel, you can
choose the text color.
3. From the "Position" area, click to choose either the top, middle, or bottom.
4. Check the "Shadow" box to add a drop shadow.