
User Guide


Collage Creator Quick Start Guide
- 4 -
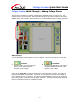
Collage Creator Walk-Through – Adding Collage Pieces
The first step in creating your collage is selecting the individual pieces you want to use. This
includes photos, clip art, and text. Notice that the left side of the screen consists of three tabs:
IMAGES, TEXT, and CLIP ART. Each tab allows you to add a different type of collage component.
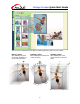
Adding Images
You can add images stored anywhere on your computer. There are two ways you can do this:
• From File
Choose a folder on your system from
which you can select images for
inclusion on your collage.
•
From Album
Choose an ArcSoft album, then use the
available thumbnail shortcuts to add
images to your collage.
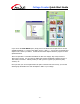
If you choose From File, use the Browse button to select the folder you want. The photos in
that folder will appear as thumbnails. In general, it’s a good idea to keep all of the images on
your computer stored in one location. It’s good to create subfolders so that you can categorize
them, but generally, you’ll want them all readily accessible. The My Documents folder is a great
place to use because it’s easy to remember and find.