
User Guide


Collage Creator Quick Start Guide
- 3 -
Getting Started
Now that you have an understanding of some of the terms that are used when referencing digital
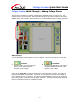
photography, let’s get started! When you first start the program, a window will appear with
some program settings:
• From the pull-down, choose the type of paper you’ll be using when you print your
collage. Even if you aren’t going to print your work (let’s say you’re going to email it to
someone), choose a paper type you like since it will affect the general dimensions of
your collage.
• Choose the desired orientation. Collage Creator lets you create both “portrait” and
“landscape” type collages.
• The initial background color for your collage is white. Click the box to select a different
color. Think of this as choosing the color of the poster board for your project. The color
you set will be the default color for all new projects. You can always change the color to
whatever you want.
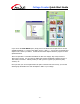
Once you click okay, you’re ready to go. Let’s walk though creating a collage! Notice that at the
top of the screen, there are 5 main buttons. Add Pieces lets you add your photos, clip art, and
text. Edit Pieces lets you modify any collage piece (add a frame or border, use a cool crop
shape, etc.). Make Pieces lets you use two mini applications to create new doodles and letter
cut-outs. Save Collage obviously lets you save your work, and Print Collage lets you print you
final project at various sizes across multiple pages.
You’ll automatically start out on Add Pieces. You need to add at least one collage piece before
many of the other options become available.