
User Guide


Collage Creator Quick Start Guide
- 7 -
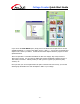
Layers
Since collage pieces can overlap, you’re provided with the means of altering the stacked, or
“layer” order of the photos.
Move a selected piece up or down in the layer order by clicking the respective layer button.
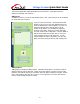
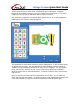
You can also click the Layers button to see a visual representation of each
layer. You can drag/drop any layer to a new position. The thumbnails go
from top to bottom, representing the stacked order of the actual collage
pieces.
Click the eye icon to hide a layer. It can be useful to hide layers when
you’re trying to select a collage component that’s mostly covered by other
objects.
To delete a layer, click the trash can icon at the bottom of the layer
palette. This completely removes the selected item from the collage. It
serves the same function as pressing the DELETE key on your keyboard
when the item is selected on the main workspace.
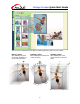
Altering the Collage View
The View buttons allow you to alter how your collage is displayed in the main workspace. Let’s
take a look at the various options and what they do.
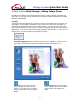
Best Fit: This is the default view. It displays the entire collage on the screen at the
largest possible size.
Zoom: Use these buttons to zoom in/out on your collage.