ARCSOFT PRODUCT FAMILY ArcSoft PhotoStudio ® Awesome photo editing for the home or office. Work with layers and enhance your photos in a number of ways. ArcSoft VideoImpression TM Create multimedia presentations by combining photos and video clips with audio, text and scene transitions. Windows 98/Me/2000/XP. Macintosh OS 8.6/9/X. Windows 98/Me/2000/XP. Macintosh OS 8.6/9/X.
About ArcSoft ArcSoft Inc. is a leading global provider or digital imaging technologies and services for business and consumer use. The company develops world-class scalable imaging software and infrastructure solutions for internet and network environments, delivering fully integrated, comprehensive visual capabilities to corporate Web sites in all major markets.
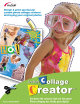
Collage Creator Quick Start Guide Table of Contents System Requirements 1 Introduction 1 Getting Started 3 Adding Collage Pieces 4 Editing Collage Pieces 9 Creating New Collage Pieces 11 Saving Collages 13 Printing Collages 13
Collage Creator Quick Start Guide System Requirements • • • • • Windows 98SE/2000/ME/XP Pentium II-based processor or equivalent 100 MB free hard disk space 64 MB RAM (128 MB recommended) 16-bit color display at 1024 x 768 Introduction Get ready—soon you’ll be creating the most unique and eye-catching collages ever. Collage Creator takes all the fun from traditional collage building while leaves out all the messy paste, paper trimmings, and most importantly, all the hard work.
Collage Creator Quick Start Guide • Resolution: You now know that the size of a digital image on your screen is noted in pixels. Resolution is simply the measurement of an image’s width and height. For example, an image that has a resolution of 100 x 100 means that it is 100 pixels high by 100 pixels wide. Note that this image may still look different on various monitors. This is because your monitor has a “resolution” as well.
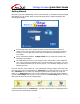
Collage Creator Quick Start Guide Getting Started Now that you have an understanding of some of the terms that are used when referencing digital photography, let’s get started! When you first start the program, a window will appear with some program settings: • From the pull-down, choose the type of paper you’ll be using when you print your collage.
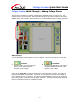
Collage Creator Quick Start Guide Collage Creator Walk-Through – Adding Collage Pieces The first step in creating your collage is selecting the individual pieces you want to use. This includes photos, clip art, and text. Notice that the left side of the screen consists of three tabs: IMAGES, TEXT, and CLIP ART. Each tab allows you to add a different type of collage component. Adding Images You can add images stored anywhere on your computer.
Collage Creator Quick Start Guide If you choose the From Album option, simply choose the album from the pull-down to see the available thumbnails. To create a new album, choose “< New >.” You can then use the Add and Acquire tools to add to your album. Consult the Interactive Help file within the program for more specific directions. Note: It’s important to remember that albums do NOT store images; they merely reference where they’re stored.
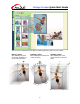
Collage Creator Quick Start Guide Here are a few commands that can help you quickly organize the photos on your collage: Moving a photo: Click and drag any photo on the main workspace to move it about the page. Rotating a photo: Click and drag the rotate anchor to spin the photo. -6- Resizing a photo: Click and drag any of the corner anchors to resize the photo.
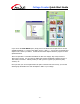
Collage Creator Quick Start Guide Layers Since collage pieces can overlap, you’re provided with the means of altering the stacked, or “layer” order of the photos. Move a selected piece up or down in the layer order by clicking the respective layer button. You can also click the Layers button to see a visual representation of each layer. You can drag/drop any layer to a new position. The thumbnails go from top to bottom, representing the stacked order of the actual collage pieces.
Collage Creator Quick Start Guide The current magnification will be listed above the Zoom buttons. If the Best Fit option is selected, it will simply state “Best Fit.” Adding Text In addition to photos, you can also add multiple layers of text. Each text layer can be modified in the exact same way as a photo. Type your text in the text box. Use the pull-downs and buttons to set your font, size, style, alignment and color. Check the Shadow box to add a shadow to your text.
Collage Creator Quick Start Guide Collage Creator Walk-Through – Editing Collage Pieces In addition to the editing we’ve already discussed (moving, resizing, rotating, and altering the layer order), the program contains three tabs that contain fun image modifying features: CROP, EFFECTS, and ENHANCE. Cropping The options under the CROP tab let you stamp out unique cutout shapes from your photos. An entire library of crop templates is available.
Collage Creator Quick Start Guide The Reset button will remove the current crop shape on the photo. Check the Soft Edge box if you want the cropped image to fade out along the edges. Use the slider to adjust the intensity of the fade. If you’re satisfied with your cropped image, click OK. Otherwise, click Cancel. Adding Effects Applying an effect works exactly the same way as applying a pre-defined crop shape. Simply select the effect you want for any photo that you feel needs to be spiced up.
Collage Creator Quick Start Guide All that you need to do is select the collage piece you want to enhance, then choose the type of enhancement you want. Click and drag the sliders to adjust the values. If you’re happy with the enhancement, click the Apply button. Click the Restore button to undo any modifications you’ve applied. Collage Creator Walk-Through – Creating New Collage Pieces The program contains two utilities that let you create additional collage pieces.
Collage Creator Quick Start Guide The size of the brush tip or eraser can be controlled with the Tool Size slider. Undo/Redo buttons are also available to help you correct any mistakes that you may make. If you want to completely start over, drag the Slide-Erase slider across the workspace. Your doodle can be applied as a transparent object, just like clip art. Or, it can be applied as a standard photo with a square, opaque background. The Letterboard tool works almost exactly the same as adding clip art.
Collage Creator Quick Start Guide Collage Creator Walk-Through – Saving Collage Pieces Your collage projects can be saved as either “projects” or “images.” Project Files Project files are files that are exclusive to the program. These files retain each individual component of your collage and allow you to edit each piece at any time. Image Files These are your standard “regular” photo files. Your collage can be saved as a single-layer, “flat” image.
Contact Information N. America 46601 Fremont Blvd Fremont, CA 94538 Tel: 1.510.440.9901 Fax: 1.510.440.1270 Website: www.arcsoft.com Email: support@arcsoft.com Central Europe 46601 Fremont Blvd. Fremont, CA 94538 USA Tel: +1-510-440-9901 Fax: +1-510-440-1270 Japan Japan Support Center M.D.S., Inc. JTT Building 3F 3-3-4 Ueno, Taito-ku Tokyo 101-0005, Japan Tel: +81-3-3834-5256 Fax: +81-3-5816-4730 Website: www.arcsoft.jp Email: support@arcsoft.jp Taiwan ArcSoft Inc.