
Assembly Instructions
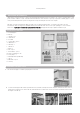

9.
Insert and secure the two Platforms in the Playspace as shown. Then, connect the three
ramps to the Platforms and the Circular Cubby to provide access to each level.
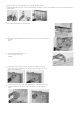
10.
Insert a Locking Hinge in each of the two holes on top of the Vertical Playspace. Attach the Play-
space Cover, making sure it hinges on the bottom. The “bubble” in the cover goes in front of the
E
xercise Wheel. Secure the cover in place by rotating the two Locking Hinges. Always make sure
the Cover is LOCKED and SECURE when the home is in use.
11.
Attach the Water Bottle in the desired location. The nozzle will fit through the wires and into the
home. It is a tight fit to prevent shifting and moving while your pet takes a drink.
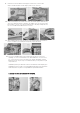
12.
PLEASE KEEP THE WHITE AND BLUE RINGS FOR FUTURE USE.
4
3
1
2
The WHITE rings allow you to attach tubes to the home for additional recreation and play space.
The WHITE rings fit accessory tubes commonly available through retailers in the United States.
The BLUE rings fit accessory tubes commonly available through international retailers.
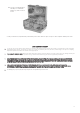
Your cage is expandable, with the option to attach tubes and other accessories (sold
separately) or to connect to another hamster home. When additional accessories are not in
use, cover the hole in the side of your hamster home with the Tube Adapter, one BLUE
RING, and a Cap. The Cap can only be secured with a BLUE ring; it is im-portant to keep all
rings for future use.