
Assembly

3
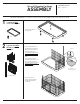
To assemble the UPPER
SECTION, you will need
these pieces:
4
To assemble the ROOF,
you will need this piece:
× 4 (connector rails)
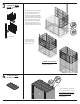
CLICK
The remaining panels all feature solid metal
guide tabs along the bottom wire and wire
clips on the side panels [see Fig. 3.1].
Start with the side panel. Use the guide tabs
to align it directly over the lower panel, then
clip the panels together by pressing down at the
middle (apex) of the wire clip [see Fig. 3.2].
A
dd the back panel—thick horizontal wires
to the exterior, aligning directly over the
lower panel with the guide tabs—and slide a
connector rail down over the two-panel seam.
Continue around the cage,
adding the side and front
panels and attaching panels
with the connector rails.
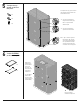
TO ASSEMBLE THE UPPER SECTION:
Repeat these steps with the duplicate set
of panels and connector rails.
Lay the roof panel over the top and weave
the loops over and under along the top edge.
Note: From the side, the center loop will
hook UNDER the horizontal wire. The loops
to the left and right will hook OVER the
top horizontal wire.
[ FIG. 3.1]
[ FIG. 3.2]
For more wonderful cages, toys, and accessories for dogs, cats, birds, chickens, rabbits, ferrets and small animals, visit our webste.