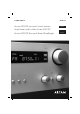
HANDBOOK Arcam AVR100 surround sound receiver Ampli-tuner audio-vidéo Arcam AVR100 Arcam AVR100 Surround-Sound-Empfängers AVR 1 0 0 E nglis h Fra nça is D eut s ch
Safety guidelines Safety instructions This product is designed and manufactured to meet strict quality and safety standards. However, you should be aware of the following installation and operation precautions: 1. Take heed of warnings and instructions You should read all the safety and operating instructions before operating this appliance. Retain this handbook for future reference and adhere to all warnings in the handbook or on the appliance. 2.
Using this handbook It may be that the AVR100 has been installed and set up as part of your system installation by a qualified Arcam dealer. In this case, you may wish to skip the sections of this handbook dealing with installation and setting up the unit. Use the Contents list (on this page) to guide you to the relevant sections. Safety Safety guidelines are set out on the inside front cover of this handbook.
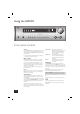
Installation Installation starts with positioning the unit where it can operate effectively. To use the radio receiver, you will need to install an FM and/or an AM aerial. AM aerial Other input signals – from CD, MD, tape, DAT, VCR, DVD, games console or satellite receiver – will need to be connected to sockets on the AVR100’s back panel. An external AM loop aerial is supplied as an accessory with the AVR100.
AUDIO PRE-OUT R L ANTENNA FRONT AM (N.AM)10K AM STEP FRONT MONITOR OUT S-VIDEO VIDEO R (EU) 9K R SURROUND L + R AUDIO L SURR GND CENTRE L + GROUND LOUDSPEAKER OUTPUTS OUT GROUND LIFT AUX FM TAPE OUT – IN CENTER R L – OUT 5.
Connecting outputs Connecting to other equipment Connecting to a power supply Monitor output Wrong plug? Both composite and S-video monitor outputs are provided for connection to the ‘Video line in’ of your TV, monitor, or projector. If you have both Composite and S-video inputs connected to your AVR100 you need only connect the S-VIDEO Monitor Output to your TV (provided that your TV accepts an S-video input).
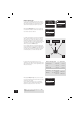
The easiest way to set up the AVR100’s multi-channel audio and video options is through its On Screen Display (OSD). To enter the OSD, ensure that you have a TV connected and press any of the arrows on the remote control’s cursor pad. • • and To navigate from the first (i.e. Setup) page, use the arrows to highlight a line. To enter a highlighted page, press OK. To leave the OSD, highlight ‘EXIT’ and press OK.
Channel delays page For best results in a surround sound system, the sound from all loudspeakers should reach the listener at the same time. To help achieve this the AVR100 can add slight delays to certain channels when in Dolby Digital or Dolby Pro Logic modes. When playing a Dolby Digital source you can set a delay for the centre channel of between 0 and 5ms and a delay for the rear channels of between 0 and 15ms.
Speaker settings page – – – – A ‘LARGE’ speaker is one that is capable of handling a full range signal (i.e. 20Hz–20kHz). A ‘SMALL’ speaker is one that is not capable of reproducing a deep bass signal (i.e. below 100Hz), for example a satellite speaker. ‘ON’ is used when a speaker is active and receives the intended audio information. ‘OFF’ is used when a speaker is inactive. Audio signals intended for speakers set to OFF are redirected to the main speakers.
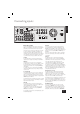
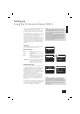
Using the AVR100 VOLUME AVR100 DOLBY PRO LOGIC RDS INFO FM MUTE/ MONO PHONES STORE PRESET/ TUNE SAT DVD SPEAKERS VIDEO 1 DOWN/UP VCR AUX EXT 5.1 SURROUND MODE TAPE MONITOR CD FM AM BASS DIRECT TREBLE POWER Front panel controls POWER Dolby Digital, DTS Press the POWER button to turn the AVR100 on. The status LED changes to green on powering up and the display shows the active input. Pressing the POWER button again turns the unit and the status LED off.
VOLUME control DOLBY PRO LOGIC SPEAKERS VIDEO 1 To adjust the volume level of the loudspeakers, pre-amp outputs and headphones use the VOLUME control. The volume level is shown in the display while it is being adjusted. Three seconds after the volume is adjusted, the display reverts to show the selected input. after 3 seconds DOLBY PRO LOGIC SPEAKERS VIDEO 1 E ng l i s h Note that different sources may require different settings of the VOLUME control to achieve the same perceived volume level.
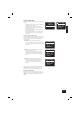
RDS: Radio Data System FM Mute/Mono The Arcam AVR100 supports RDS Programme Service and RDS Radio Text on FM broadcasts. The AVR100’s tuner has an auto-muting circuit that, when engaged, mutes any signal that is of insufficient strength for listening. To engage this circuit press the FM MUTE/MONO button on the front panel: ‘FM MUTE’ is shown in the display. If a signal is muted you will hear no sound through the loudspeakers.
Using the remote control The CR-340 remote control gives access to all functions available on the front panel, plus some additional functions only available from the remote. It also has controls to operate Arcam CD and DVD players. E ng l i s h CR-340 Remote Control CD/DVD lights These indicate the function of the CD/DVD button at the bottom of the control. They are not related to any function on the AVR100. The LED only stays on for 15 seconds to conserve battery life.
Reference Bi-wiring and bi-amping loudspeakers Before you start Bi-amping your system WARNING: Do not make any connections to your amplifier while it is switched on or connected to the mains supply. Before switching on please check all connections thoroughly, making sure bare wires or cables are not touching the amplifier in the wrong places (which could cause short circuits) and you have connected positive (+) to positive and negative (–) to negative.
Troubleshooting E ng l i s h The following table should help you diagnose most problems that may arise when using the AVR100. Problem Cause Solution No audio 1. Power Lead unplugged or not switched on 2. In stand by mode 3. Mute on 4. Tape monitor selected 1. Check mains lead is connected to AVR100 and that the wall switch is on 2. Press the POWER/STANDBY button on remote handset 3. Switch mute off 4. Press the TAPE MONITOR button 1. 2. 3. 4. 1. 2. 3. 4.
Technical specifications AMPLIFIER SPECIFICATION RADIO SPECIFICATION Output power (20Hz–20kHz at 0.5%THD) FM section 8Ω, five channels 8Ω, two channels 8Ω, single channel 30 preset stations available 70W 90W 100W Harmonic distortion, 1W, 8Ω at 1kHz 0.02% typical Left/right crosstalk > 60dB at 1kHz Frequency response ±1.
Worldwide Guarantee This entitles you to have the unit repaired free of charge, during the first two years after purchase, at any authorised Arcam distributor provided that it was originally purchased from an authorised Arcam dealer or distributor.
Consignes de sécurité Normes de sécurité Bien que l’AVR100 soit conçu et fabriqué selon des normes de qualité et de sécurité extrêmement strictes, il est conseillé de respecter les consignes d’installation et d’utilisation ci-après. 1. Avertissements et consignes Il est conseillé de lire les consignes de sécurité et d’utilisation avant de mettre l‘ AVR100 en marche.
Utilisation de ce manuel L’AVR 100 peut également avoir été incorporé dans une chaîne Hi-Fi par un revendeur Arcam qualifié. Dans ce cas, il est possible de sauter les chapitres traitant de l’installation et du réglage de l’appareil. La table des matières renvoie aux chapitres correspondants. Sécurité Les consignes de sécurité figurent au verso de la couverture de ce manuel.
Installation L’installation commence par la mise en place de l’appareil à l’endroit où il pourra fonctionner le plus efficacement possible. L’utilisation du syntoniseur (tuner) nécessite l’utilisation d’une antenne FM et/ou AM. Les sources autres que CD, MD, tape, DAT, VCR, DVD doivent être reliées aux prises « terre » situées sur le panneau arrière de l’AVR 100.
Branchement des entrées AUDIO PRE-OUT R L ANTENNA FRONT AM (N.AM)10K AM STEP FRONT MONITOR OUT S-VIDEO VIDEO R (EU) 9K R SURROUND L + R AUDIO L SURR GND CENTRE L + GROUND LOUDSPEAKER OUTPUTS OUT GROUND LIFT AUX FM R L SUB WOOFER OUT 5.
Branchement des sorties Branchement à d’autres appareils Sortie moniteur « MONITOR OUTPUT » Des sorties composites et S-vidéo sont prévus pour le raccord du canal vidéo de la télévision, du moniteur ou du projecteur. Si les entrées composites et S-vidéo sont branchées sur l’AVR100, il suffit de brancher la sortie « S-VIDEO MONITOR OUTPUT » à la télévision, à condition que cette dernière accepte ce type d’entrée.
Réglage Utilisation de l’affichage à l’écran (OSD) Pour cela, s’assurer que la télévision est branchée et appuyer sur l’une des flèches de la télécommande. Il est toujours possible de revenir à la page d’équilibrage de canaux sans repasser par l’affichage écran en appuyant sur le bouton TEST de la télécommande. Appuyer à nouveau sur TEST pour sortir de cette page. • • Pour naviguer à partir de la première page (Setup), utiliser les flèches et pour mettre une ligne en surbrillance.
Page CHANNEL DELAYS (réglage du retard des canaux) Pour obtenir les meilleurs résultats avec un système multicanal, le son produit par chacune des enceintes doit parvenir en même temps à l’auditeur. Pour obtenir ce résultat, L’AVR100 permet ajouter de légers retards à certains canaux en mode Dolby Digital ou Dolby Pro Logic. Le retard du canal central d’un équipement Dolby Digital peut être réglé entre 0 et 5 millième de seconde (ms), et celui du canal arrière entre 0 et 15 ms.
Page SPEAKER SETTINGS (réglage des enceintes) Cette page permet de définir la taille et la quantité d’enceintes acoustiques. – – – INPUT SETTINGS CHANNEL BALANCE CHANNEL DELAYS SPEAKER SETTINGS EXIT Une enceinte de type “LARGE” peut reproduire la bande passante complète (c’est-à-dire 20Hz–20kHz). Une enceinte de type SMALL ne peut pas reproduire les basses fréquences (c’est-à-dire inférieures à 100 Hz) (hautparleur de satellite, par exemple).
Utilisation de l’ampli-tuner audio-vidéo AVR100 VOLUME AVR100 DOLBY PRO LOGIC RDS INFO FM MUTE/ MONO PHONES STORE PRESET/ TUNE SAT DVD SPEAKERS VIDEO 1 DOWN/UP VCR AUX EXT 5.1 SURROUND MODE TAPE MONITOR CD FM AM BASS DIRECT TREBLE POWER Commandes en façade POWER (Alimentation) Appuyer sur le bouton POWER pour mettre l’AVR100 en marche. Le témoin de marche passe au vert et l’affichage indique l’entrée active. Appuyer de nouveau sur POWER pour éteindre ce témoin et le récepteur.
Commande de VOLUME Cette commande permet de régler le volume des enceintes acoustiques, des sorties de pré-amplification et du casque. Le niveau du volume est affiché pendant le réglage. Trois secondes plus tard, l’affichage revient à l’entrée sélectionnée. DOLBY PRO LOGIC SPEAKERS VIDEO 1 CH dB Noter que les appareils peuvent demander des réglages de commande de volume différents pour donner une impression de niveau identique.
Système RDS (Radio Data System) FM Mute/Mono L’ampli-tuner audio-video Arcam AVR100 accepte les systèmes RDS Programme Service et RDS Radio Text lors des retransmissions FM. Le tuner du récepteur AVR100 comporte un circuit de coupure automatique qui, lorsqu’il est enclenché, coupe tout signal trop faible pour être entendu. Pour enclencher ce circuit, appuyer sur le bouton MUTE/MONO FM du panneau avant: l’affichage indique “FM MUTE”, et aucun son ne passe par les haut-parleurs.
Utilisation de la télécommande Télécommande CR-340 La télécommande CR-340 permet d’accéder à toutes les fonctions du panneau avant ainsi qu’à certaines fonctions complémentaires, accessibles uniquement à partir de celle-ci. Elle comprend également les commandes nécessaires pour utiliser les lecteurs CD et DVD Arcam. Voyants CD/DVD Ces voyants correspondent au bouton CD/DVD de la partie inférieure de la télécommande. Ils ne sont liés à aucune des fonctions du récepteur AVR100.
Référence Bi-câblage et bi-amplification des haut-parleurs Avant de commence Bi-amplification du système ATTENTION: Ne pas effectuer de branchements sur l’amplificateur pendant qu’il est en marche ou relié au secteur. Commencer par vérifier soigneusement toutes les prises, en s’assurant que les câbles ou les fils dénudés ne sont pas en contact avec l’amplificateur (ce qui pourrait provoquer des courts-circuits) et que les (+) sont reliés aux (+) et les (-) aux (-).
Dépannage Problème Cause Solution Pas de son 1. 1. 2. Cordon d’alimentation non branché ou appareil non mis en marche En mode standby 3. 4. Son coupé (fonction MUTE) Moniteur de bande sélectionné 3. 4. 1. 2. 3. 4. Enceinte non branchée ou mal branchée Entrée non branchée ou mal branchée Haut-parleur sur OFF dans la page SETUP Niveau de canal trop faible 1. 2. 3. Pas de son sur un canal 2. 4.
Spécifications techniques SPECIFICATIONS AMPLIFICATEUR SPECIFICATIONS RADIO Puissance de sortie (20Hz – 20kHz avec distorsion harmonique totale (THD) de 0,5%) Section FM 8Ω, cinq canaux 8Ω, deux canaux 8Ω, un seul canal 70W 90W 100W Identification station RDS, Affichage des informations radio Distorsion harmonique, 1W, 8Ω a1kHz 0,02% type Diaphonie G/D > 60dB à 1kHz Réponse de fréquence ±1,0dB 20Hz à 20kHz Entrées Entrée de canal : Sensibilité Impédance d’entrée Marge de surcharge 200mV > 10kΩ
Garantie Cette garantie vous autorise à faire réparer gratuitement votre récepteur chez un distributeur Arcam agréé durant les deux premières années suivant l’achat, à condition que l’appareil ait à l’origine été acheté chez un revendeur ou un distributeur Arcam. Le fabricant ne peut engager sa responsabilité en cas de défauts découlant d’un accident, d’une mauvaise utilisation, d’une utilisation intensive, d’une usure normale, d’une négligence ou d’un réglage ou d’une réparation non autorisée.
Sicherheitsrichtlinien Sicherheitsrichtlinien Dieses Gerät wurde unter Berücksichtigung strikter Qualitätsund Sicherheitsbestimmungen entworfen und gefertigt. Sie sollten jedoch bei der Installation und dem Betrieb folgende Vorsichtsmaßnahmen treffen: 1. Beachten Sie Warnungen und Anweisungen. Vor der Inbetriebnahme dieses Gerätes sollten Sie die entsprechenden Sicherheits- und Betriebsanweisungen lesen.
Hinweise zum Handbuch Sollte Ihr AVR100 von einem qualifizierten Arcam-Händler als Teil Ihrer HiFi-Anlage installiert worden sein, können Sie die Abschnitte zum Installieren und Einrichten des Gerätes überspringen. Das Inhaltsverzeichnis (auf dieser Seite) gibt Ihnen einen Überblick über die Abschnitte des Handbuches. Sicherheit Auf der Innenseite des Deckblattes finden Sie die Sicherheitsrichtlinien.
Installation Zuerst müssen Sie das Gerät an einem geeigneten Standort aufstellen. Wenn Sie den Radioempfänger nutzen wollen, müssen Sie außerdem eine UKW- bzw. MW-Antenne installieren. Andere Eingangssignale (CD, MD, Kassette, DAT, VCR, DVD, Spielekonsole oder Satellitenempfänger) müssen an den entsprechenden Buchsen auf der Rückseite des AVR100 angeschlossen werden. Ausgangssignale (Fernseher, Monitor, Projektor, Vorverstärker, Lautsprecher oder andere Audio- bzw.
Anschließen der Eingänge AUDIO PRE-OUT R L ANTENNA FRONT AM (N.AM)10K AM STEP FRONT MONITOR OUT S-VIDEO VIDEO R (EU) 9K R SURROUND L + R AUDIO L SURR GND CENTRE L + GROUND LOUDSPEAKER OUTPUTS OUT GROUND LIFT AUX FM TAPE R L SUB WOOFER OUT 5.
Anschließen der Ausgänge Anschließen anderer Geräte Anschließen der Stromversorgung. Monitorausgang. Falscher Netzstecker? Für den Anschluss am Videoeingang eines Fernsehers, Monitors oder Projektors sind Composite- und S-Video-Monitorausgänge vorhanden. Sind am AVR100 sowohl Composite- als auch S-Video-Quellen angeschlossen, müssen Sie nur die Buchse S-VIDEO-MONITOR OUT mit Ihrem Fernseher verbinden, vorausgesetzt, dieser kann S-Videosignale verarbeiten.
Einrichten des Geräts Das On Screen Display (OSD) Schließen Sie zum Aufrufen des OSD einen Fernseher an und drücken Sie einen der Pfeile auf dem Cursorblock der Fernbedienung. • • Verwenden Sie zum Auswählen einer Option auf der ersten Seite (SETUP – Einrichten) die Pfeile und , um eine Zeile zu markieren. Drücken Sie „OK”, um die markierte Seite aufzurufen. Markieren Sie zum Beenden des OSD die Option „EXIT” (Beenden) und drücken Sie „OK”.
Seite „CHANNEL DELAYS” Um bei einem Surround-Sound-System das beste Ergebnis zu erzielen, sollte der Ton aus allen Lautsprechern gleichzeitig beim Hörer ankommen. Sie können daher im Dolby Digital- oder Dolby Pro Logic-Modus leichte Verzögerungen einstellen. Beim Wiedergeben einer Dolby Digital-Quelle können Sie für den mittleren Kanal eine Verzögerung zwischen 0 und 5 ms und für die hinteren Kanäle zwischen 0 und 15 ms einstellen.
Seite „SPEAKER SETTINGS” (Lautsprechereinstellungen) Auf dieser Seite des OSD wird die Größe und die Anzahl der Lautsprecher bestimmt. – – – – Ein „LARGE” (großer) Lautsprecher kann den vollen Frequenzbereich abdecken (d.h. 20 Hz – 20 kHz). Ein „SMALL” (kleiner) Lautsprecher kann keine Tiefen erzeugen (d.h. Signale unter 100 Hz). Wählen Sie „ON” (Ein), wenn der Lautsprecher aktiv ist und die Audiosignale empfängt. Wählen Sie „OFF” (Aus), wenn der Lautsprecher nicht aktiv ist.
Der AVR100 VOLUME AVR100 DOLBY PRO LOGIC RDS INFO FM MUTE/ MONO PHONES STORE PRESET/ TUNE SAT DVD SPEAKERS VIDEO 1 DOWN/UP VCR AUX EXT 5.1 SURROUND MODE TAPE MONITOR CD FM AM BASS DIRECT TREBLE POWER Steuerelemente an der Vorderseite POWER Drücken Sie zum Einschalten des AVR100 die Taste „POWER” (Netz). Die Status-LED leuchtet grün, und der aktive Eingang erscheint auf der Anzeige. Wenn Sie die Taste erneut drücken, werden das Gerät und die LED ausgeschaltet.
VOLUME (Lautstärke) Mit dem Regler „VOLUME” können Sie die Lautstärke der Lautsprecher, des Vorverstärkers und des Kopfhörers einstellen. Die Lautstärke wird im Display angezeigt, während Sie den Regler betätigen. Drei Sekunden nachdem die Lautstärke verändert wurde wird wieder der aktive Eingang angezeigt. DOLBY PRO LOGIC SPEAKERS VIDEO 1 CH dB nach 3 Sekunden Beachten Sie, dass für verschiedene Audioquellen evtl.
RDS: Radio Data System FM MUTE/MONO Der Arcam AVR100 unterstützt „RDS Programme Service” und „RDS Radio Text” von UKW-Sendern. Der Tuner des AVR100 ist mit einem Stummschaltungsschaltkreis ausgestattet, der automatisch Signale unterdrückt, die zu leise sind. Drücken Sie zum Auswählen dieses Schaltkreises die Taste „ FM MUTE/MONO “ auf der Gerätevorderseite. In der Anzeige erscheint kurz die Meldung „FM MUTE”. Wenn ein Signal unterdrückt wird, hören Sie nichts über die Lautsprecher.
Die Fernbedienung Die Fernbedienung CR-340 Die Fernbedienung CR-340 enthält sowohl alle Steuerelemente der Gerätevorderseite sowie einige weitere, die nur über die Fernbedienung verfügbar sind. Außerdem können Sie mit der Fernbedienung CD- und DVD-Spieler von Arcam steuern. CD/DVD-LEDs Diese zeigen die Funktion der Taste „CD/DVD” im unteren Bereich der Fernbedienung an. Sie haben mit den Funktionen des AVR100 nichts zu tun. Die LED leuchtet nur 15 Sekunden lang auf, um die Batterie zu schonen.
Zusätzliche Informationen Bi-Wiring und Bi-Amping der Lautsprecher Erste Schritte Bi-Amping der Anlage Warnung: Schließen Sie keine Geräte am Verstärker an, während dieser eingeschaltet oder mit dem Netz verbunden ist. Prüfen Sie vor dem Einschalten alle Kabelverbindungen sorgfältig und achten Sie darauf, dass keine blanken Kabel das Verstärkergehäuse berühren (dies könnte einen Kurzschluss auslösen) und dass die positiven (+) und negativen (–) Pole richtig angeschlossen wurden.
Fehlerbehebung In der folgenden Tabelle finden Sie Lösungshinweise zu Problemen, die beim Betrieb des AVR100 auftreten können. Problem Ursache Lösung Kein Audiosignal 1. Netzstecker gezogen oder Gerät nicht eingeschaltet 1. 2. Im Standby-Modus 3. MUTE aktiviert 4. Bandmonitor ausgewählt 2. 3. 4. 1. Lautsprecher nicht oder nicht ordnungsgemäß angeschlossen 2. Quelle nicht oder nicht ordnungsgemäß angeschlossen 1. 3. Lautsprecher auf der Seite „SETUP” als „OFF” gekennzeichnet 4.
Technische Daten Verstärker Tuner Ausgangsleistung (20 Hz–20 kHz bei 0,5 % Klirrfaktor) 8 Ω, fünf Kanäle 70 W 8 Ω, zwei Kanäle 90 W 8 Ω, ein Kanal 100 W Klirrfaktor, 1 W, 8Ω bei 1 kHz 0,02 % (Durchschnitt) Übersprechen (links/rechts) > 60 dB bei 1 kHz Frequenzumfang ± 1,0 dB 20 Hz – 20 kHz Eingänge Line-Eingänge Empfindlichkeit Eingangsimpedanz Überladungsgrenzwert Eingangsempfindlichkeit (Vorverstärker) 200 mV > 10 kΩ > 20 dB 740 mV (normale Verstärkung) Ausgänge Vorverstärker Nominale Ausgangssp
Garantie Weltweite Garantie Weitere Informationen erhalten Sie von Arcam direkt: Sie sind berechtigt, das Gerät während der ersten zwei Jahre nach Kaufdatum bei einem autorisierten Arcam-Fachhändler kostenlos reparieren zu lassen, unter der Voraussetzung, dass es ursprünglich bei einem Arcam-Händler erworben wurde. Der Hersteller übernimmt keine Verantwortung für Schäden, die durch Unfall, Missbrauch, Verschleiß, Vernachlässigung oder unautorisierte Veränderungen bzw. Reparaturen entstehen.
AVR100 50
AVR100 51 E ng l i s h
PEMBROKE AVENUE, WATERBEACH, CAMBRIDGE CB5 9PB, ENGLAND telephone +44 (0)1223 203203 fax +44 (0)1223 863384 email support@arcam.co.uk website www.arcam.co.