Using the Web-Based Advanced User Interface Setting your ISP Connection Type to PPPoE Most DSL providers use PPPoE as the connection type. If you use a DSL modem to connect to the Internet, your ISP may use PPPoE to log you into the service. If you have an Internet connection in your home or small office that doesn’t require a modem, you may also use PPPoE.
Using the Web-Based Advanced User Interface 1. 2. 1 User Name This space is provided to type in your user name that was assigned by your ISP. 2 Password 3 Type in your password and re-type it into the “Retype Password” box to confirm it. 3. Service Name 4. 5. MTU 4 5 The MTU setting should never be changed unless your ISP gives you a specific MTU setting.
Using the Web-Based Advanced User Interface Setting your Internet Service Provider (ISP) Connection Type to Point-to-Point Tunneling Protocol (PPTP) [European Countries Only]. Some ISPs require a connection using PPTP protocol, a type of connection most common in European countries. This sets up a direct connection to the ISP’s system. Type in the information provided by your ISP in the space provided. When you have finished, click “Apply Changes” (8).
Using the Web-Based Advanced User Interface 5. 1 Password Type your password here. Then retype it into the “Retype Password” box. 6. PPTP Default Gateway Provided by your ISP. Enter your service IP address here. 7. Idle Time Out 3 4 5 6 7 8 9 10 11 29 section The “Maximum Idle Time” feature is used to automatically disconnect the Router from your ISP when there is no activity for a specified period of time.
Using the Web-Based Advanced User Interface Setting Custom Domain Name Server (DNS) Settings A “Domain Name Server” is a server located on the Internet that translates Universal Resource Locators (URLs) like “www.belkin.com” into IP addresses. Many Internet Service Providers (ISPs) do not require you to enter this information into the Router. The “Automatic from ISP” box (1) should be checked if your ISP did not give you a specific DNS address.
Using the Web-Based Advanced User Interface 1 system as the original MAC address and will allow the connection to work. If you are not sure whether your ISP needs to see the original MAC address, simply clone the MAC address of the computer that was originally connected to the modem. Cloning the address will not cause any problems with your network. 2 Cloning your MAC Address 4 Entering a Specific MAC Address In certain circumstances you may need a specific WAN MAC address.
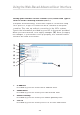
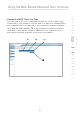
Using the Web-Based Advanced User Interface Viewing LAN Settings Clicking on the header of the “LAN Setup” tab (1) will take you to its header page. A quick description of the functions can be found here. To view the settings or make changes to any of the LAN settings, click on “LAN Settings” (2) or to view the list of connected computers, click on “DHCP Client List” (3).
Using the Web-Based Advanced User Interface 1 Changing LAN Settings All settings for the internal LAN setup of the Router can be viewed and changed here. 2 3 4 (2) 5 (3) 6 (4) 7 (5) 8 (6) 9 10 1. IP Address The “IP address” is the internal IP address of the Router. The default IP address is “192.168.2.1”. To access the Web-Based Advanced User Interface, type this IP address into the address bar of your browser. This address can be changed if needed.
Using the Web-Based Advanced User Interface 3. DHCP Server The DHCP server function makes setting up a network very easy by assigning IP addresses to each computer on the network automatically. The default setting is “On”. The DHCP server can be turned OFF if necessary; however, in order to do so you must manually set a static IP address for each computer on your network. To turn off the DHCP server, select “Off” and click “Apply Changes”. 4.
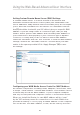
Using the Web-Based Advanced User Interface 1 Viewing the DHCP Client List Page You can view a list of the computers (known as clients), which are connected to your network. You are able to view the IP address (1) of the computer, the host name (2) (if the computer has been assigned one), and the MAC address (3) of the computer’s network interface card (NIC). Pressing the “Refresh” (4) button will update the list. If there have been any changes, the list will be updated.
Using the Web-Based Advanced User Interface Configuring the Wireless Network Settings The “Wireless” tab lets you make changes to the wireless network settings. From this tab, you can make changes to the wireless network name (SSID), operating channel, and encryption security settings. You can also configure the Router to be used as an access point. (1) (2) Changing the Wireless Network Name (SSID) To identify your wireless network, a name called the SSID (Service Set Identifier) is used.
Using the Web-Based Advanced User Interface 1 Securing your Wi-Fi® Network Here are a few different ways you can maximize the security of your wireless network and protect your data from prying eyes and ears. This section is intended for the home, home office, and small office user. At the time of this User Manual’s publication, there are three encryption methods available.