
User's Manual
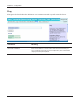
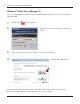
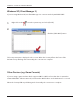
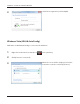
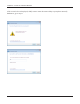
Table Of Contents
- Chapter 1 - Product Overview
- Chapter 2 - Placing Your AirStation
- Chapter 3 - Installation
- Chapter 4 - Configuration
- Chapter 5 - Connect to a Wireless Network
- Chapter 6 - Trouble Shooting
- Appendix A - Specifications
- Appendix B - Default Configuration Settings
- Appendix C - Network-USB Navigator
- Appendix D - TCP/IP Settings
- Appendix E - Restoring the Default Configuration
- Appendix F - Shared Folders and the USB Port
- Appendix G - Regulatory Compliance Information
- Appendix H - Environmental Information
- Appendix I - GPL Information
- Appendix J - Warranty Information

Chapter 5 Connect to a Wireless Network
WBMR-HP-G300H User Manual 97
Manual Setup
You can also connect to the AirStation without installing Client Manager V or Client Manager 3 by
using the utility built-in to Windows. The procedure varies depending on which version of Windows
you are using.
Note: · If the AirNavigator CD is used to perform setup when making the initial settings of AirStation, the
wireless connection settings for the AirStation are completed during the Setup process. As a result, you
do not need to make the settings below. After setup is complete, once the LAN cable is removed, you
can connect from your wireless client to the AirStation.
· Before performing setup, make the settings to enable the wireless client of the computer.
Windows 7 (WLAN AutoCong)
With Windows 7, use WLAN AutoCong to connect to the AirStation.
1
Click on the network icon in the system tray.
2
Select the target AirStation’s name and click
[Connect]. If you will be connecting to this
device in the future, checking [Connect
automatically] is recommended.