
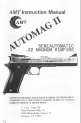
Manual
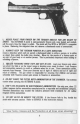

TO DISASSEMBLE THE PISTOL
WARNING: ENSURE PISTOL IS UNLOADED BEFORE ATIEMPTING DISASSEMBLY~
. 7flJlifTij
SECTION
TITlED
"TO UNLOAD THE PISTOL ~
J. Refer to section titlad 8TO UNLOAD THE PISTOL
8.
Remove magazine and visually
inspect chamber to ensure the pistol is empty.
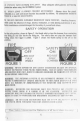
2. With slide
pullad back engage the slide stDP tD lock it Dpen, hDld the stide statiDnary and.
push
slide
StDp DUt frDm right tD left untD
slide
stDP is DUt, then let stide mDve fDrward.
CAUTION:
The ejlCtDr il beld in pllce by the llide. BI weful Dot to 1011 the
ejector. Notl the wey the ejector fits iDthe frame.
3. Put safety
in flfl
(safety Dff) pDsitiDn; then, remove sOde and barrel assembly by pushing
it
tDwards
the
front Df the pistol Ensure YDU don't lose the ejector.
CAmDN:
.
Donot let b8mmerfall without .lide In place. TbiI will ClUlIdImIg8
to the "'mmer .trut.
WARNING: TAKE CARE IN RELEASING THE TENSION ON SPRING.LDADED PARTS
TO PREVENT PERSONAL INJURY OR DAMAGE TO PARTS.
4. TD
remDve barrel from stide, delress recoil rDd bushing tD claar barrel bushing. Rotate
barrel bushing counterclDckwise 45 and the recoil rod and spring will coma out of the stide.
5. RemDve barrel bushing. Barrel and recoil rod can nDW be remDved from the bDttom and
. back Df the stide SD that sUde and barrel can be cleaned.
8. DO NOT DISASSEMBLE FRAMEIGRIP PARTS. If the cDmpDnents within the prip frame
need service for any relSon, return the pistol to the factDry. See SERVICE sectron
Df
this
.
manual for instructiOns.
TO ASSEMBLE THE PISTOL
1.
InstaD barrel and recoD rod into slide through the bottom and back of slide.
2.
Insert barrel bushing so that it is rDtated cDunterclockwise
45°.
3.
Insert recDD rDd spring and bushing. With the recoD rod bushing on the recoD spring,
cDmpress spring untO recoil rDd bushing is flush with the front Df the slide.
4.
Press barrel bushing untO it is fully against stide and rotate clockwise to locked pDsition.
WARNING: DO NOT PUSH SLIDE AND BARREL PAST THE POINT WHERE THE HOLE
LINES UP FOR SLIDE STOP AND BARREL TANG AS THE TRIGGER RETURN SPRING
WILL BE BfNT AND CAUSE TENSION TO BE LOST.
5.
Make sure recoil rod and barrel are parallel
in the
slide. Ensure ejectDr is properly
located in frame and that hammer is stiD cocked; then, with safety in fire position, instaO
slide assembly and align hole in frame with barrel tang and insert slide stDP halfway.
8. PuO
sUde untO sUde stop
is
aligned with notch and push slide stop in and up untO it is
fuRy engaged.
.
7.
Relaase slide stop and let sUde move fDrward tD clDsed pDsitiDn tD cDmplete assembly.
Wear Safety Glasses and Ear Protection at all times when shooting!
9