
Instruction Manual

Flex 12EPH/8EPH Standard, AB and Tandem Instruction Manual (FCC/CE)
September 2016
Page 21 of 43
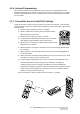
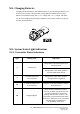
5.5. Changing Batteries
Changing transmitter batteries (“AA” alkaline battery x 2) by unscrewing the battery cover
located on the backside of the transmitter. During battery installation make sure the
batteries are installed correctly, with “+” to “+” charge and “–” to “–” charge. Also make
sure the screw is tightened after battery installation to avoid water, moisture, dirt, grease,
and other liquid penetration.
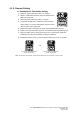
5.6. System Status Light Indications
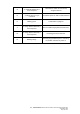
5.6.1. Transmitter Status Indications
Type
Display Type
Indication
1
Constant red
Voltage below 1.8V at initial power on or
during operation
Voltage below 1.75V during operation
(receiver MAIN output shut off)
2
1 red blink followed by a
2-second pause
Voltage below 1.85V during operation
(change batteries suggested)
3A
2 red blinks followed by a
2-second pause
Defective or jammed pushbutton detected
at initial power on
3B
No light displayed
When defective pushbutton condition
occurs (2 red blinks, type 3A above), find
out which pushbutton is defective by
pressing all of them one at a time. If the
pushbutton is in good working order when
pressed, the Status LED is off. If the Status
LED maintained 2 red blinks then
the pushbutton is defective.