
Installation Guide

If any problem should occur during installation, or
if you have any questions, please reach out to us
We thank you for choosing sensors from
Disruptive Technologies.
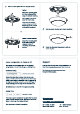
The sensor has two settings that can be adjusted
using Studio or the API: Sensitivity and Activity Timer
d21s.com/suppor
support@disruptive-technologies.co
EU +44 808 164 1905
(08:00–16:00 CET/CEST)
US +1 (855) 714-3344
(8 am – 5 pm EST)
Support
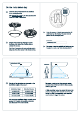
There are two options for mounting the sensor.
6
Lock the sensor in place by turning it clockwise.
Fasten the included safety screw to lock the
sensor in place.
7
8
Determines how close a person have to be to the
sensor, as well as the how long the person has to stay
within a zone before a detection event is triggered. In
the highest sensitivity mode, the sensor will trigger if
people quickly grace the edge of the detection zone
By default sensors ship with the highest sensitivity
How long a zone is considered occupied after the most
recent “People detected” event. The longer the Activity
Timer is, the longer the battery will last
See datasheet for detailed description
Sen
s
itivity
Setting
High Sensitivity (default)
5 0
M
inutes Seconds
Sensor con
guration via Studio or API
A
c
tivity
Ti
m
e
r
Dropdown option in Studio
Input option in Studio
Option
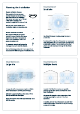
2
(recommended
Attach the mounting plate
to the ceiling using the
included screws. If
necessary, use the wall
anchors.
O
p
ti
o
n
Attach the mounting plate
to a clean ceiling surface
using the adhesive backing.
Add a single screw to the
center for e
x
tra safey.
Plea
s
e
n
o
te:
the adhesive
creates a strong bond to the
surface and can
’
t be removed
and reapplied once placed.
O
r