
Instructions / Assembly


— 3 —
Aquatic • 8101 E. Kaiser Blvd. • Anaheim, CA 92808 • (800) 877-2005 • FAX (714) 998-5340 • www.aquaticbath.com
Installation Instructions
4-Piece A
2
Composite Shower System Models
Fax on Demand # 1360
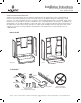
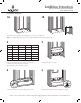
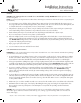
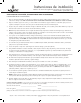
Check dimensions. For tub-showers, refer to Diagram 1A; for showers, refer to Diagram 1B.
NOTE: If you’re adding additional accessories such as a grab bar–additional framing may be needed for support.
6"x12"
AA
AA
C
C
DD
B
B
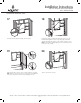
Lift and place the base into framing.
Level and mark all sides. Front apron should be firmly on the floor.
Models A B C D
6030-CT 60” (1525mm) 31-1/4” (794mm) 2-7/8” (73mm) 14-1/4” (362mm)
3232-CPAN 32” (810mm) 32” (810mm) 16” (405mm) 15-1/2” (394mm)
3636-CPAN 36” (915mm) 36” (915mm) 18” (458mm) 17-1/2” (445mm)
4834-CPAN 48” (1220mm) 34” (864mm) 24” (610mm) 16-1/2” (419mm)
6034-CPAN 60” (1525mm) 34” (864mm) 30” (762mm) 16-1/2” (419mm)
6030-CPAN 60” (1525mm) 30” (762mm) 8-1/2”(216mm) 14” (356mm)
6"Dia.
AA
C
C
DD
B
B
6"Dia.
DD
CC
1A 1B
3
4
2
Pre-install unit to ensure framing pocket is plumb, square and a level
installation can be achieved (see steps 3 through 9).
Adjust framing as needed – Shim where necessary.
Lift and place the back wall, making sure locking tabs are engaged.
5
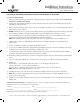
INSTALLATION PROCEDURE