
Installation Guide

Aquatic • 8101 E. Kaiser Blvd. • Anaheim, CA 92808 • (800) 877-2005 • FAX (714) 998-5340 • www.aquaticbath.com
— 3 —
Installation Instructions
2-Pc Remodeline (Sectional Units)
Fax on Demand # 9053
General Cleaning Cautions
n Clean the application surface immediately before caulking.
n Use cleaning solvents in a well-ventilated area, following all safety precautions and instructions listed on the product label.
n Do not use detergent or soap to clean the application surface; silicone sealants will not adhere to soap residue or scum.
Silicone should be inspected periodically and reapplied as necessary to prevent any water related issues. If mold or mildew is present, clean the
area with a disinfectant and apply rubbing alcohol.
Follow the procedures below for application of silicone and to ensure proper maintenance:
1. Apply silicone/caulk remover to soften the sealant material (silicone/caulk or grout) that is being replaced.
2. Peel out the old sealant material using a soft putty blade or awl (non-metal utensils).
3. Apply a strip of painter’s masking tape along the inside edge of each side of the joint/s where silicone sealant will be applied.
4. Apply silicone to the joint/s and smooth over with finger or caulking tool.
5. Remove tape strips along joint edges after the silicone is applied and smoothed out, while the silicone is still wet.
NOTE: Allow silicone to cure for 24 hours (normal cure time) before using bath or shower. Humidity affects the curing process and different geographi-
cal areas experience varying degrees of humidity. Refer to silicone manufacturers’ instructions for additional information related to curing times.
CAUTION: When using any cleaning or polishing materials, make sure to read and follow all package instructions carefully. Wear rubber gloves
at all times and avoid contact with eyes, skin, clothing, rugs and furnishings. Make sure all residues are rinsed off thoroughly.
DIAGRAMS
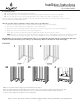
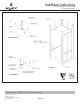
NOTE: Use of foundation material is highly recommended for firmer bottom support.
Prepare a foundation material mix (industrial plaster, mortar mix). Place three or four mounds on the subfloor around but away from drain
hole. The mounds should be high enough so that when the unit is set, it will cause the foundation material to displace and spread.
For showers, refer to Diagram 3A; for tub-showers, refer to Diagram 3B.
3B 43A
21