
Installation Guide

Aquatic • 8101 E. Kaiser Blvd. • Anaheim, CA 92808 • (800) 877-2005 • FAX (714) 998-5340 • www.aquaticbath.com
— 1 —
Installation Instructions
2-Pc Remodeline (Sectional Units)
Fax on Demand # 9053
NOTICE: Please inspect the unit thoroughly before installation to make sure it has not been damaged during transportation.
If you have any questions please call Aquatic’s Technical Services Department at 800-945-2726.
IMPORTANT! Before installation begins:
a. READ ALL INSTALLATION INSTRUCTIONS COMPLETELY. IMPROPER INSTALLATION WILL VOID THE WARRANTY.
b. Make sure that walls and floors meet fire safety requirements of local building code and/or FHA/HUD Minimum Property Standards.
c. On the underside of your unit, you may notice either wood blocks or legs, these are part of a pre-leveled base system and should not be removed.
d Do not install the unit over open floor joist. Shimming and/or foundation material may be required for additional support if sub floor is uneven.
NOTE: Finished alcove must have interior dimensions, shown on product technical data sheet rough-in diagrams, to properly install unit.
Pre Installation Requirements
a. In remodeling, if necessary, add studs at each end to provide a vertical nailing surface for the side nailing flanges of bath fixture product.
b. To avoid obstruction during installation make sure that supply lines, spout pipe and valve plumbing do not project into alcove.
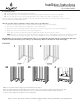
c. Shower stalls require a 6” (150mm) diameter floor opening for 2” (50mm) IPS drain fitting connection. [See Diagram 1]
d. Tub/showers require a 6” x 12” (150mm x 305mm) floor opening for the 1
1
⁄2” (40mm) drain, waste and overflow (DWO) kit. [See Diagram 2]
NOTE: Be sure floor opening location matches left-hand or right-hand bath fixture drain location.
e. Use of industrial plaster, mortar mix or non shrink grout (foundation material) is recommended in all commercial structures (i.e. hotels, motels, dormitories,
health clubs, etc.).
f. Fasteners: To wood framing - 1” (25mm) galvanized roofing nails or 1” (25mm) pan head screws; to steel studs - drill flanges and studs with
3
⁄16”
(5mm) carbide bit and fasten with #10 x 1” (25mm) sheet metal screws with washers; to concrete/block walls use 1” (25mm) concrete nails with
nailing tool or impacter. NOTE: Pre drilling nailing flanges is recommended to avoid cracking the unit.
g. If installing shower door, refer to the shower door manufacturer’s installation instructions for any special considerations.
NOTE: Where local codes specify minimum door openings shower stalls may require swing (not sliding) doors.
INSTALLATION
If mounting fittings on tub or shower; from stable reference points (back wall studs, floor) measure the locations of spout and valves. Note measurements here:
Tub Filler: Valve:
Shower Arm: Valve:
(Mark dimensions only if shower arm is plumbed within bath fixture wall area.)
n Make sure framed-in alcove is of proper size per AQUATIC dimensions, square, and plumb; check floor for levelness. Shimming and/or foundation
material may be required to bring alcove into Aquatic specifications.
n Disassemble unit as received into two separate sections (base and wall section).
n To prevent scuffing while installing unit cover the entire bottom of the unit with a piece of cardboard or other protective material.
n Bottom support materials: industrial plaster, mortar mix or non-shrink grout (herein referred as foundation materials) are not necessary but its use is highly
recommended for a firmer bottom support. When using foundation materials, the following applies:
In a bucket, mix foundation material. Place three or four mounds of plaster on the sub floor around but away from drain hole. The mounds should be
placed high enough so that when the unit is set, it will cause the plaster to displace and spread. [See Diagrams 3A/3B]
n Carry base into bathroom and place into framing pocket. Level lengthwise and width wise using 3’ (915mm) level by shimming or depressing founda-
tion materials. The unit should be set level, front apron should be firmly on the floor.
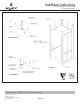
n Pre-drill horizontal nailing flanges along top of base section and fasten into each corresponding stud. [See Diagram 5: Detail A]
n Pre-drill both (vertical) side nailing flanges and fasten to side studs 8” (200mm) on center.
n Place a silicone bead on top of the base section ledge where wall section mounts to base, creating a seal. Make sure that the silicone bead is placed
completely around to create a watertight seal.
NOTE: Use 100% silicone sealant with mildew resistant properties to caulk unit.
n Place wall section into alcove atop base.
n Align front vertical surface area of walls with base.
n a. Fasten top horizontal nailing flange of wall section to each stud. [See Diagram 5: Detail A]
b. Fasten both side vertical nailing flanges of wall section to vertical studs 8” (200mm) on center.
NOTE: Shimming is required if gap exists between nailing flange and stud.
n When other than cementitious backer board plaster is to be used, furring strips as thick as nailing flanges are recommended for installation on studs
above the installed AQUATIC unit to assure walls will be flush. 100% silicone sealant with mildew resistant properties should be applied between the
backer board and horizontal surface of unit. Finished wall materials can be applied [See Diagram 5: Detail A]. Finishing of other trades should be
done in conformance with applicable codes and generally accepted building practices.