AquaMetrix 2300 Multi-Input Controller Quick Start Guide 2300 Controller Quick Start Guide, Rev. 1.
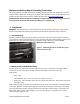
Welcome to the Easy Way of Controlling Your Probes This guide augments the operation manual, showing you how to mount and configure the standard 2300 Controller. Information on using the controller with additional or non-standard I/O cards can be found in the operation manual, which is available for download on www.Aquametrix.com. This Quick Start Guide is written for software-preconfigured 2300’s to allow wiring and start of basic operation of the controller without hooking up to a network first. 1.
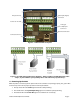
Pulse Input (digital) Connector Relay Connector Power 120-220 VAC Analog (420mA) Input Connector L N G Ethernet Connection Contacts Connector Figure 2 - 2300 Controller back panel Figure 3 - Possible analog probe wiring diagrams. There are other possible three-wire probe setups, so please refer to your specific probe’s instructions for proper hook up. 1.3. Powering Up the 2300 With the probes connected, power up the 2300.
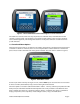
The Run screen should appear and display 4 panes. It will show the actual mA reading of the four analog probes (see Figure 4). Dashes (----) indicate that a probe is either not connected or it is out of range. Note that the preconfigured software only shows the actual current being read by the 2300. In order to have probe outputs expressed in the appropriate units (e.g. pH, mV, µS/cm, etc.) you need to carry out set-up over a network using a web browser. See Section 1.5 or 1.
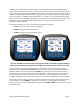
Figure 5 - The channel Detail screen and Configure screen for Channel 1 The detailed screen lists alarm and relay set points, last calibration date, and will flash when the channel is in alarm mode. The configure screen allows resetting of the alarm and relay set points, alarm acknowledgement, and zeroing of the totalizer and dispenser functions and other channelspecific functions. 1.4.
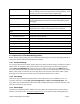
Table 2 – Front Panel Menu Structure Menu Item Description View System Info Single screen showing unit Name, IP Address, etc. Calibrate/Disable Probe Enable, disable, or calibrate probes Select Probe Any defined probe, including virtual probes Select Action Calibration is 2-point calibration for the analog inputs, K Factor scaling for the digital inputs.
1. Go to its Ethernet settings. On a PC it is in Control Panel > Network. On a Macintosh it is in System Preferences > Ethernet. 2. Select Manual configuration of IPv4. You may choose your own IP address. For illustration purposes we will start with the static IP address that comes as the default for the 2300. 3. Set the IP address to 192.168.7.1. 4. Set the Subnet mask to 255.255.255.0.
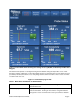
Figure 7 - Probe Status menu showing four analog sensors (pH, ORP, conductivity and Dissolved Oxygen) The 2300 and the probes are configured using the five buttons along the top of this screen. Their functions and their submenus are described below in Table 2. Note that there are two other levels of password protection, that don’t access everything that the admin level does: these screens are what an admin-level user sees.
were being pushed on the actual unit. These actions update the unit accordingly, which in turn updates the simulated display. Try to remember to leave the Remote Display in RUN mode! Logs Data Logs Brings up the list of daily data logs in memory, allowing data to be emailed, downloaded, or deleted.
own email account, talk to your IT department or follow the directions below. Note that the 2300 internal web server does not support SSL security protocol, so you may have to establish a third party email provider such as juno.com to generate the emails. To change the email server, select Setup > Network Setup > Email Setup > SMTP Connection Setup. The two required configuration values are the SMTP server address and the SMTP port. The SMTP server address can be entered as a DNS name (e.g. SMTP.mycompany.
Figure 8 - Probe Configuration page 3. Go and Explore Names are self-explanatory and instructions are included on the pages of the various wizards, so feel free to go out and explore. Most wizards require a Submit to confirm changes, so you can play around and just hit Cancel when you are done. After setting up the probes and the monitors, the network connection may be severed if desired, allowing the 2300 to be used as a stand-alone controller.