
Operating instructions


Cleaning The AR-1 Air Release Vent
The AR-1 may accumulate dirt in the seat area of the fl oat assembly, which may cause the vent to malfunction. Periodic cleaning is
recommended. The AR-1 may be serviced without depressurizing or draining the system.
To clean the seat area, proceed as follows:
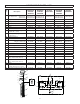
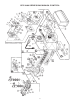
1) Turn the vent body to the right to the closed position, while holding the lower brass portion, isolating the vent from the system
(See Figure 11).
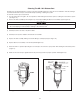
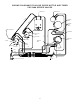
2) Remove the fl oat assembly by unscrewing the top of the body and lifting the black cover assembly up (See Figure 12).
CAUTION
CAUTION
To reduce the risk associated with property damage due to water leakage:
• Do not bend spring on fl oat assembly or damage to the vent may result.
3) Carefully clean the seat area of any dirt or debris.
4) Carefully clean any dirt or debris from inside the vent chamber.
5) Replace the fl oat assembly, making sure that the O-ring is seated properly (See Figure 12).
6) Replace black cover assembly on air vent body. Hand tighten only.
7) Return the AR-1 to operation by turning the air vent body to the left to the open position while holding the lower brass portion
(Figure 11).
8) Make sure the red vent cap is tightened all the way to the stop position for proper operation. Hand tighten only.
6-2
Figure 11. OPEN/CLOSE AIR RELEASE
Figure 12. EXPLODED VIEW