
Operating instructions

Instructions for use of Fillport Adapter Base
IMPORTANT NOTE
IMPORTANT NOTE
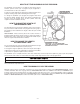
Before performing any of the following operations, place unit into Bypass by turning the inlet and outlet knobs to “Bypass” Position
(See Figure 5).
Attaching AR1 Air Release Valve
1) Relieve pressure by staging fi lter into backwash position.
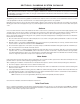
2) Remove fi ll port cap, Figure 7.
3) Attache the AR1 Air Release Valve to the fi llport cap, shipped
with the air release valve, using an 1/8” 45° elbow. Air Release
should be installed vertically.
4) Replace Air Release-Cap Assembly.
5) It is recommended that a length of 1/4” poly tubing be run from
the top of the air release to a suitable drain. This is done so any
entrained moisture will go to drain when the air release vents.
6) Return unit to service.
Replenishing Media:
1) In order to be able to replenish media, water must be drained from
the tank. Therefore, perform the steps in the following section on
Draining Water From Filter. You will not need to completely drain
the tank, removal of approximately 1-2 gallons should be suffi -
cient.
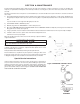
2) After draining the tank, insert the fi ll funnel as shown in Figure 8.
3) Add the required amount of replenishment media.
4) Fill the mineral tank to the top with water, as required.
5) Replace fi llport cap.
6) Return fi lter to service and backwash unit to mix new material with
the old and remove any fi nes.
CAUTION
CAUTION
To reduce the risk associated with skin, eye, and respiratory
tract irritation from dust from fi lter media during installation:
• Gravel and several types of fi lter media may be used in this
product, depending upon the application. During installation,
dust may cause irritation to skin, eyes, and respiratory tract,
and may affect lungs.
• Utilize a NIOSH-approved dust fi lter mask and appropriate eye
protection when handling and pouring gravel and fi lter media.
• Refer to MSDS documents for further safety information.
Draining Water From Filter:
1) Stage program wheel on control valve powerhead to backwash position to relieve pressure.
IMPORTANT NOTE
IMPORTANT NOTE
Lift end of drain line to retain water in the line. DO NOT allow drain line to empty. If drain connection is to a rigid pipe, disconnect it
at the drain line fl ow control and attach a length of fl exible tubing for this operation.
2) Stage program wheel to space between backwash and rapid rinse.
3) Remove fi ll port cap (Figure 7).
4) Lower end of drain line. Filter will now siphon itself empty of water. You can terminate the siphoning action at any time by staging
the control valve to service position.
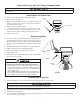
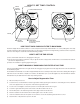
CLIP
FILLPORT
CAP
FILLPORT BODY
FILLPORT
BODY
FUNNEL
Figure 7
Figure 8
3-7